
1Before you start
Your online store is www.dluxetribute.com.sg. It runs on Shopify. You run your store from the Shopify admin (the control panel behind your website). We built the design.
You can do yourself
- Add, edit and hide pieces
- Mark a piece as sold
- Create discount codes and sales
- Manage and fulfil orders
- Check sales, visitors and payouts
- Update policies, company details, delivery and tax
Ask us first
- Installing any app (see section 2)
- Changing the website design or layout
- New pages, menus or sections
- Changing the theme
- Your domain name
The pictures in this guide come from your own Shopify admin. Red numbers point to the button each step talks about. Tap any picture to make it bigger.
2Important: apps and charges
Your Shopify plan is paid by Genaxis. Anything that adds a charge to the Shopify bill lands on Genaxis's card.
This also covers payment providers that Shopify charges a transaction fee for, such as the Atome providers in section 18. Many apps look free at first and start charging after a trial, so please check with us before you click Install on anything.
To see which apps are installed, click Settings, then Apps.
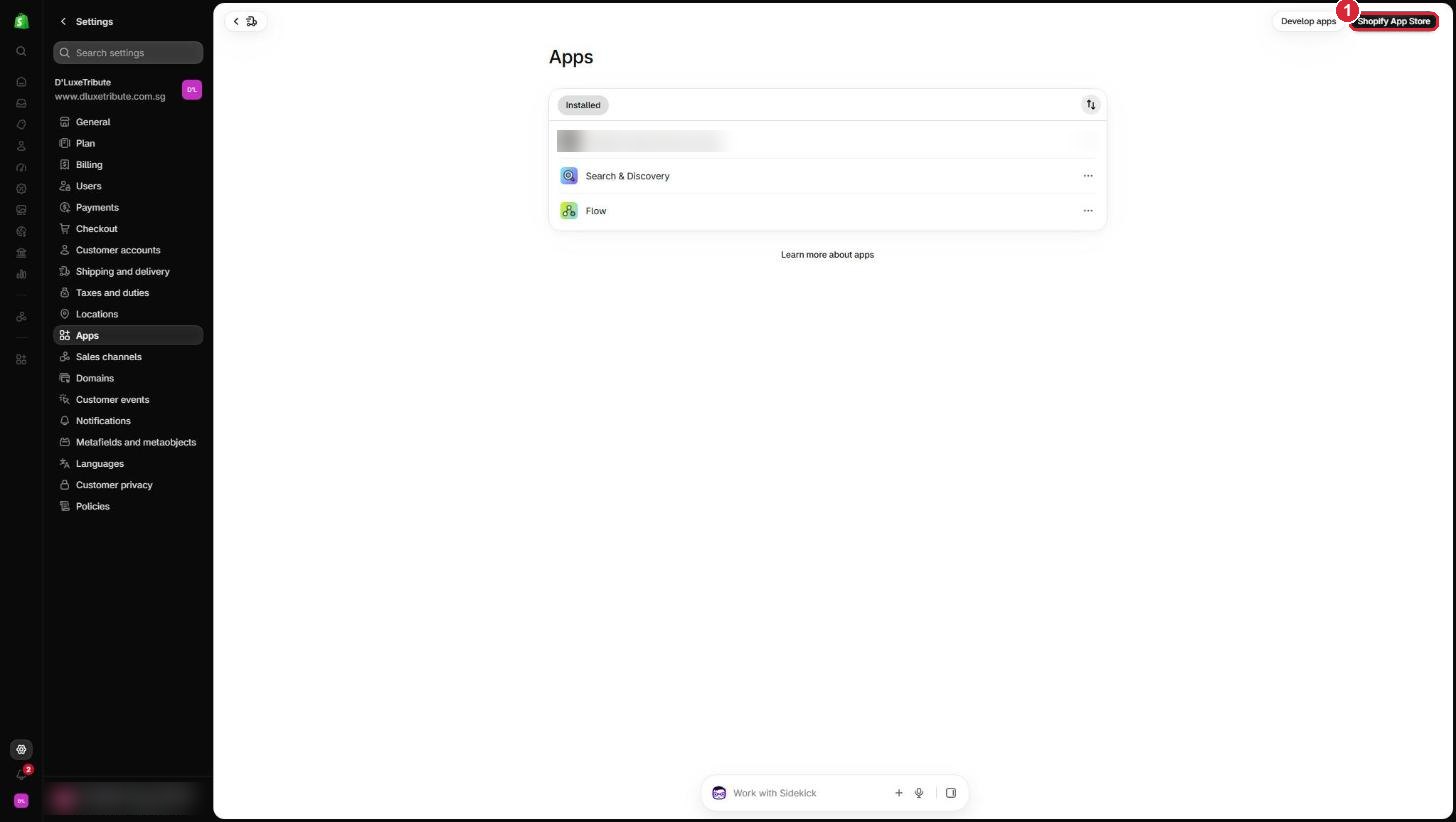
- 1Shopify App Store: please do not install from here without our consent or approval.
To ask, send us a support request (see section 20) with the app's name and what you want it to do.
3Log in and find your way
- Go to admin.shopify.com and log in with the email address the store is registered to.
- Choose the store D'LuxeTribute. You will see your admin home page.
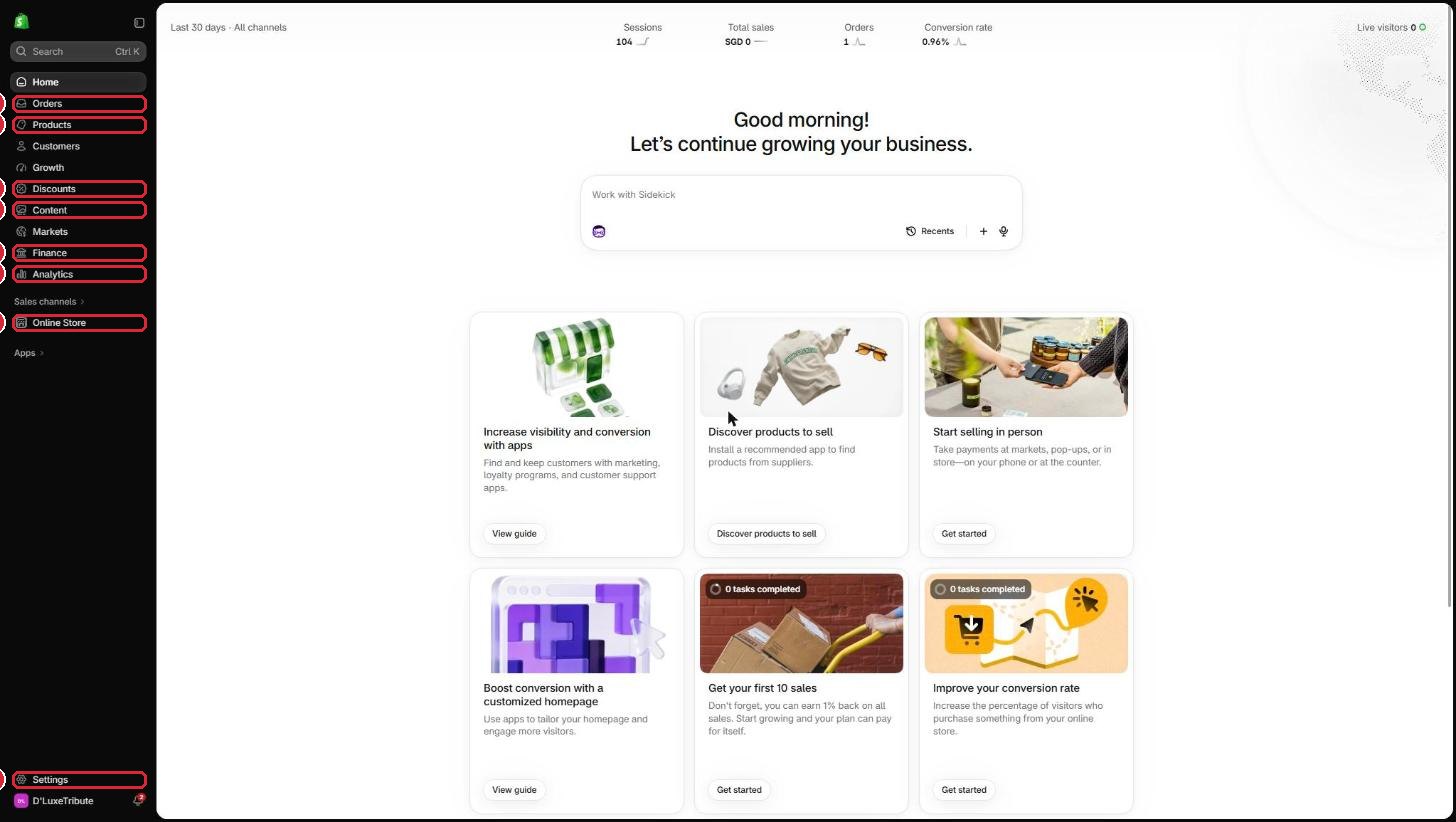
- 1Orders: what customers have bought.
- 2Products: every piece in your store.
- 3Discounts: discount codes and sales.
- 4Content: your images and files.
- 5Finance: your payouts.
- 6Analytics: sales and visitors.
- 7Online Store: your website's design.
- 8Settings: company details, payments, delivery, tax and policies.
4Your orders
Every purchase on your website appears here, newest first. Shopify also emails the store email address for each new order.
- Click Orders on the left.
- Click an order number to open it. You will see the piece, the customer's details, the delivery method they chose and whether they have paid.
- When the piece has been handed over or sent, click Fulfill item inside the order, add the tracking number if there is one, then click Fulfill item again. The customer gets an email that it is on the way.
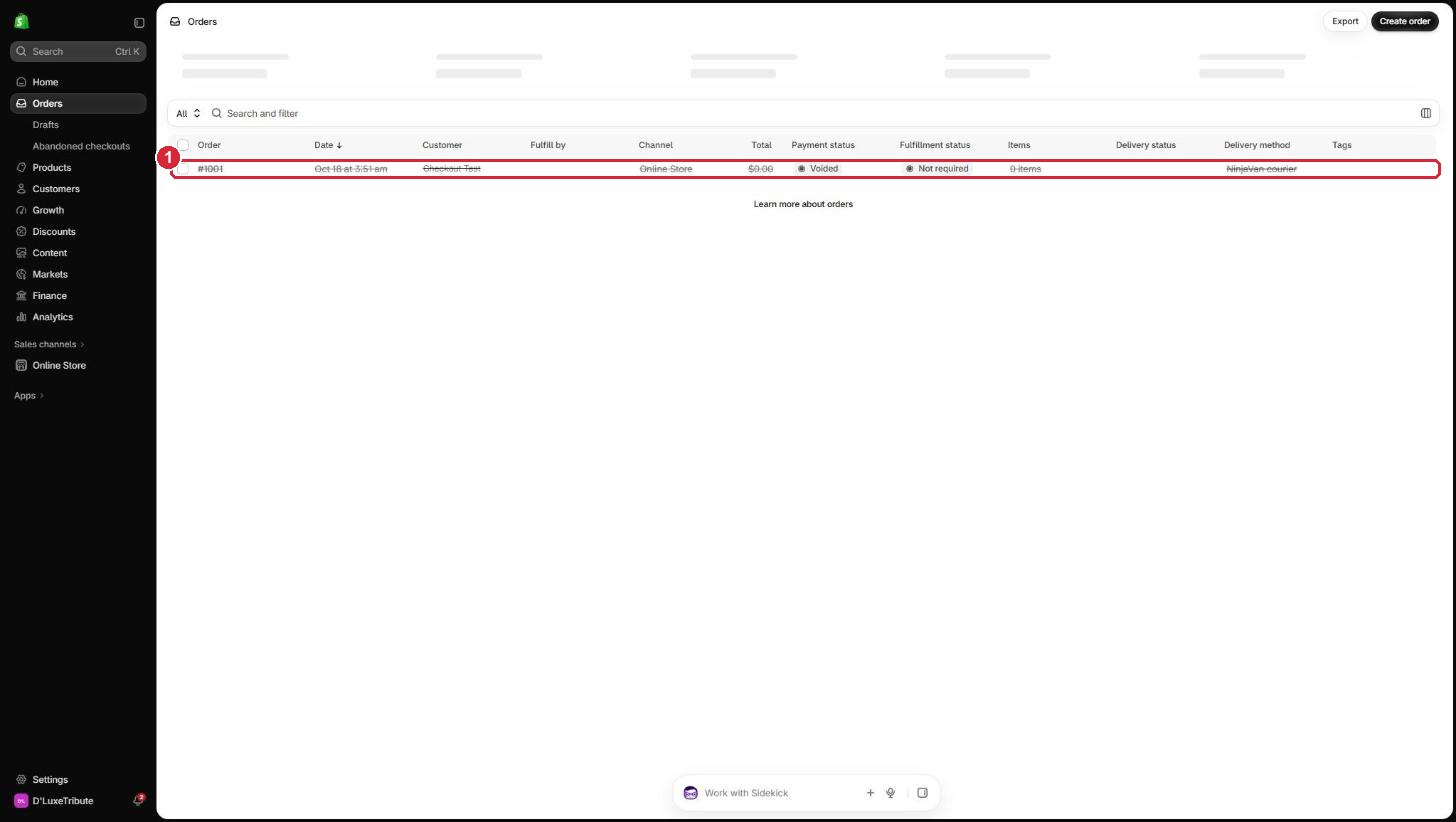
- 1An order. Payment status tells you if it is paid; Fulfillment status tells you if it has been sent.
5Add a new piece
Each piece you sell is one product. The quickest way is to copy the way your existing pieces are filled in.
- Click Products on the left.
- Click Add product at the top right.
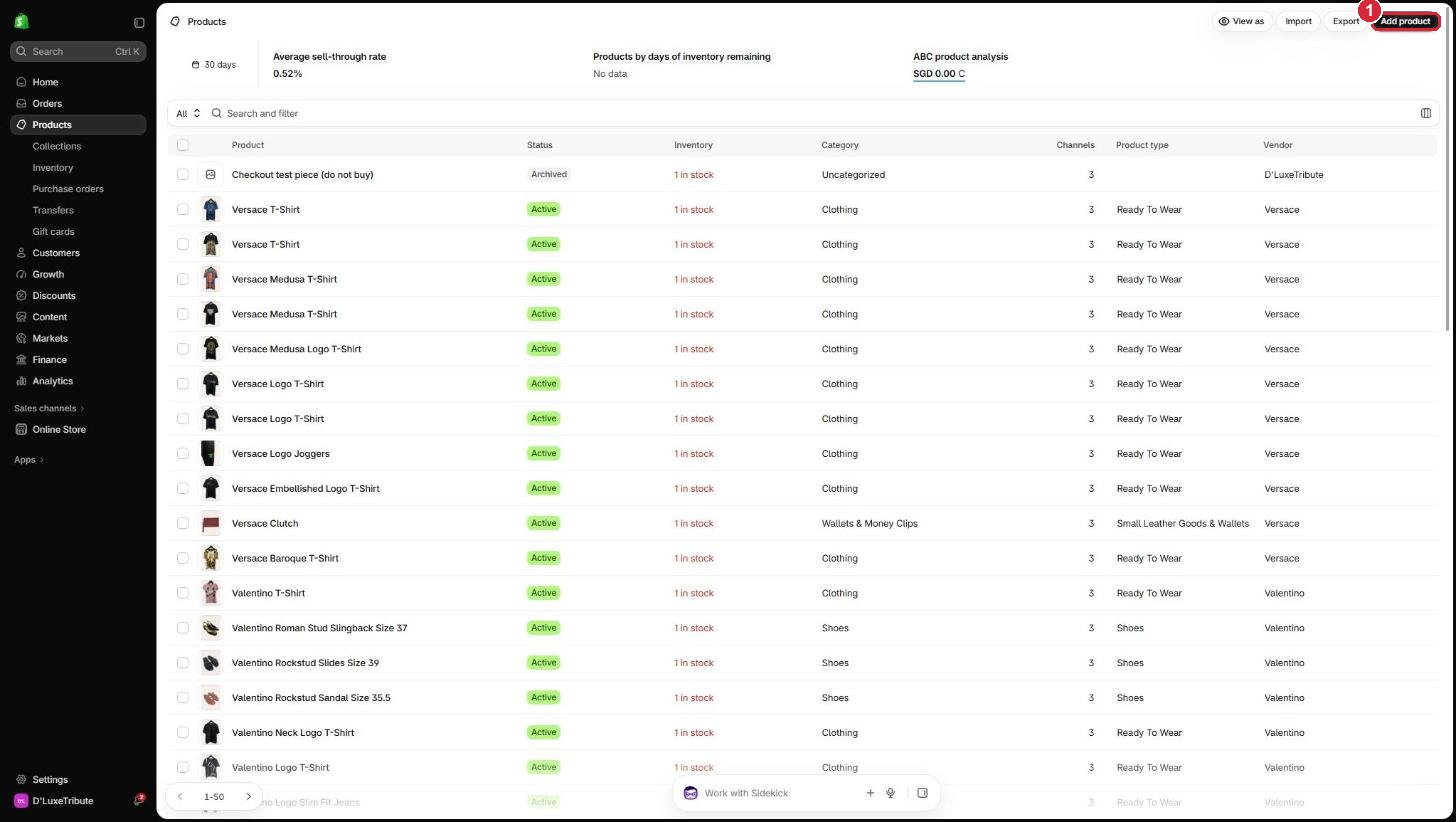
- 1Add product.
You will see an empty product form. Fill it in from top to bottom:
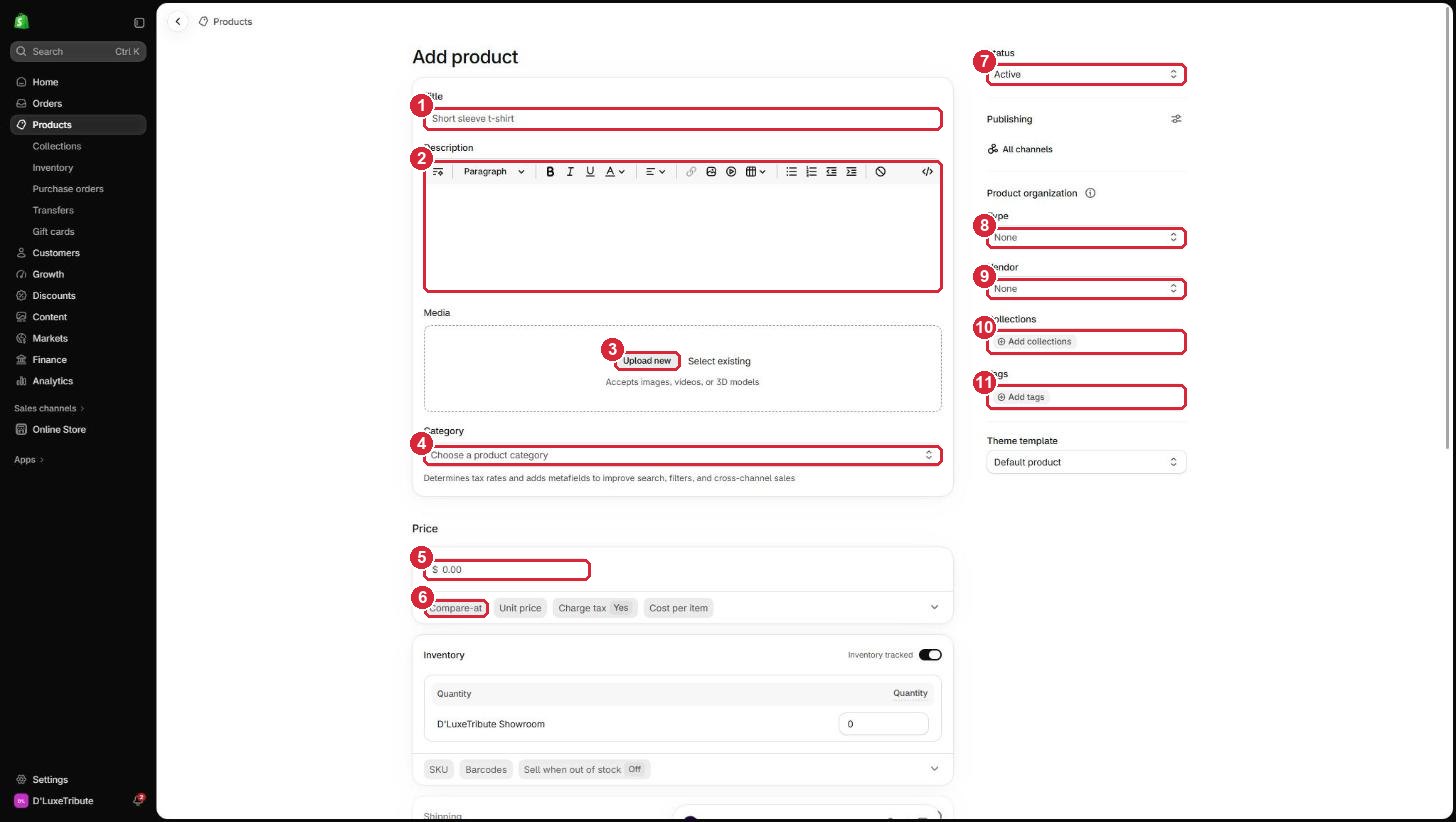
- 1Title: brand, model and size, for example "Alexander McQueen Flexion Sneaker Size 37".
- 2Description: the Brand, Size and Comes with table, then your condition note. Copy it from an existing piece (see section 6) so every piece looks the same.
- 3Upload new: add the photos. The first photo is the one customers see in the shop grid. Drag photos to change the order.
- 4Category: start typing, for example "Sneakers" or "Handbags", and pick from the list.
- 5Price: your selling price in S$.
- 6Compare-at: the retail price when new. Your website shows it crossed out next to your price.
- 7Status: Active shows the piece on your website. Draft keeps it hidden while you work on it.
- 8Type: choose from the list, for example Shoes, Ready To Wear, or Small Leather Goods & Wallets.
- 9Vendor: the brand, for example Chanel or Hermes. Pick it from the list so it matches your other pieces.
- 10Collections: the pages it appears on, for example New Arrivals, Shoes and the brand.
- 11Tags: labels the website uses, for example "New Arrivals", "Shoes", "Sneakers", the brand and "Size EU 37".
Scroll down for the rest:
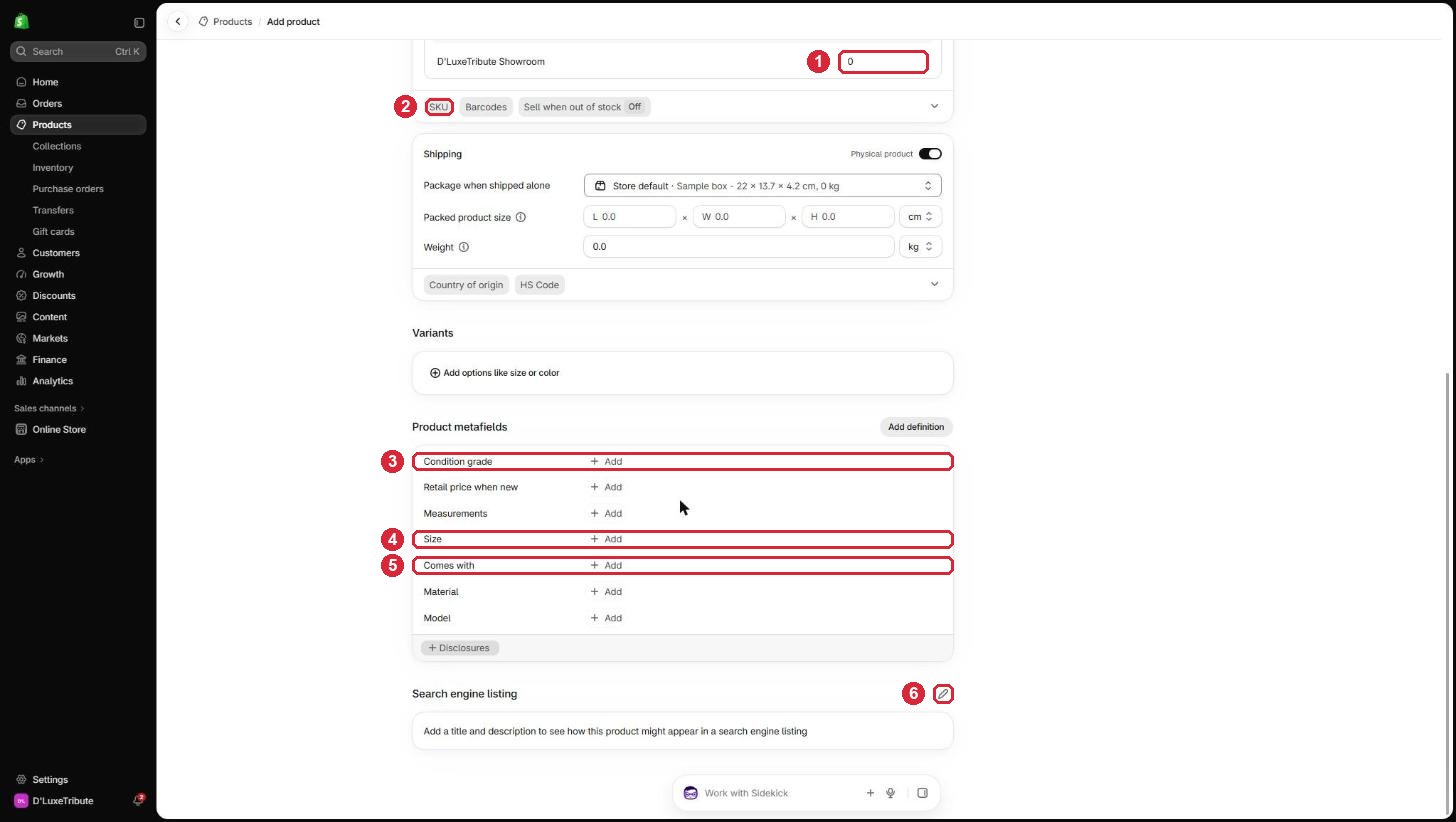
- 1Quantity at D'LuxeTribute Showroom: 1. Each piece is one of a kind, so once it sells it shows as sold out by itself.
- 2SKU: your stock code, for example DLT4477.
- 3Condition grade: how the piece has been graded.
- 4Size: for shoes, write it exactly like "EU 37". The shoe size filter on your website reads this field.
- 5Comes with: for example "Item only", "Dust bag" or "Full set".
- 6Search engine listing: click the pencil to write the title and short description Google shows. Follow your existing pieces, for example "Pre-owned Alexander McQueen Flexion Sneaker Size 37, checked by our experienced authenticators. S$259. Free delivery in Singapore."
- Click Save at the bottom or top right. The piece is now live if its status is Active.
- Click View at the top to see it the way customers see it.
6Edit a piece or mark it sold
- Click Products, then type part of the name in Search and filter.
- Click the piece to open it. Change what you need, then click Save.
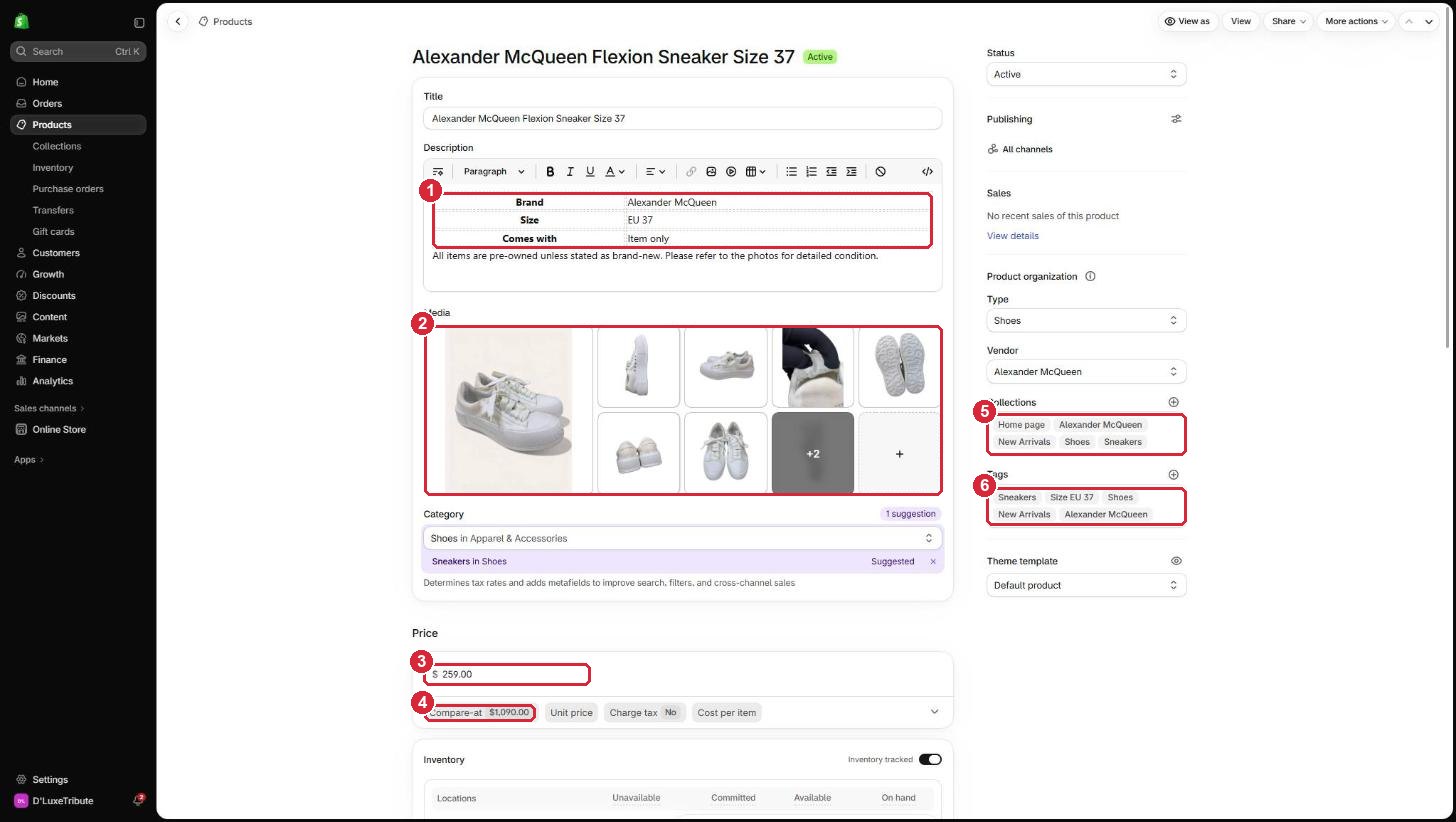
- 1The Brand, Size and Comes with table.
- 2The photos. Click + to add more.
- 3Your selling price.
- 4The retail price when new, shown crossed out.
- 5The pages this piece appears on.
- 6Its tags, including the size tag.
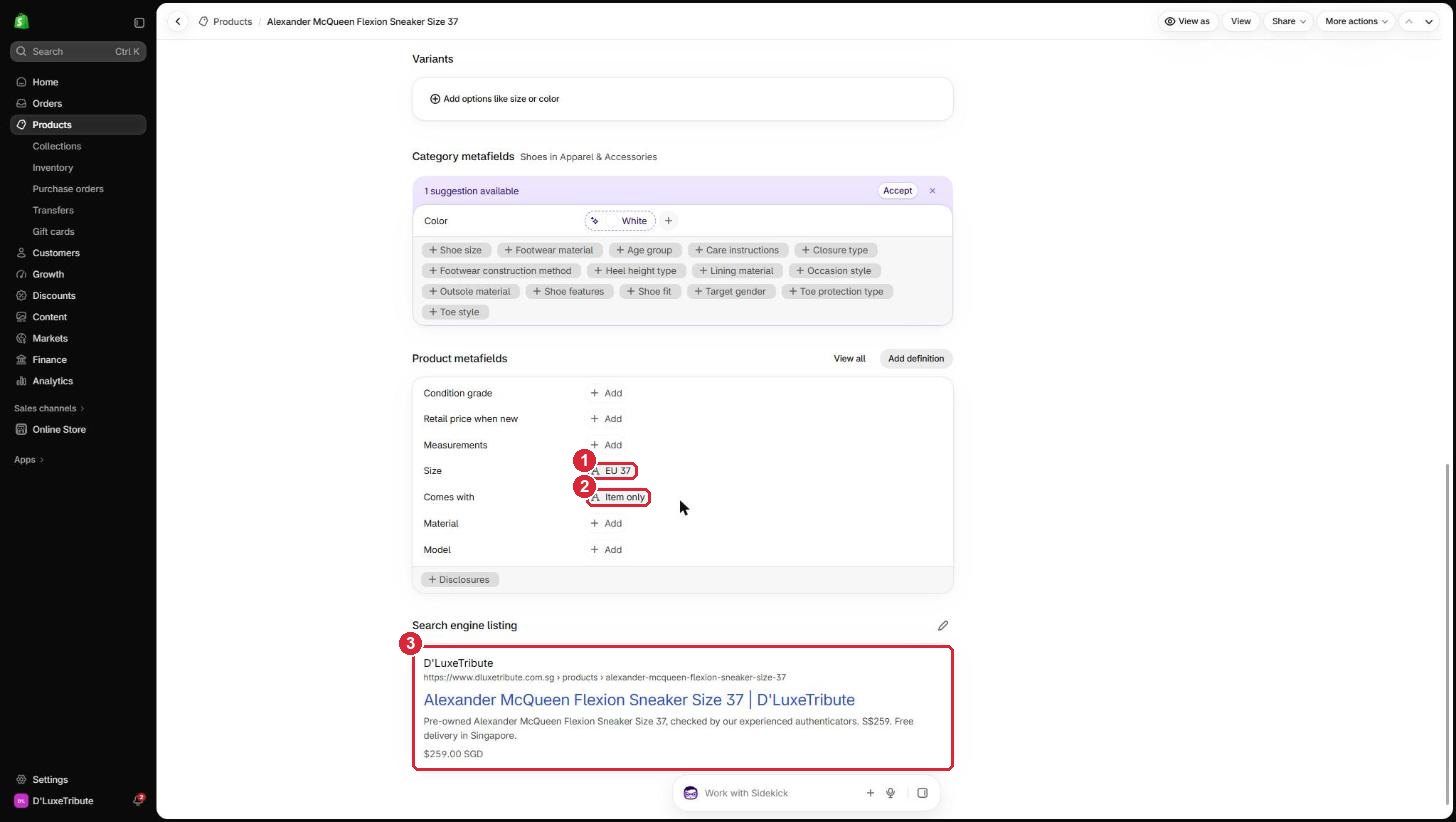
- 1Size written as "EU 37".
- 2Comes with.
- 3How the piece looks in Google results.
When a piece sells somewhere else (showroom, Carousell, WhatsApp)
- Open the piece and change the showroom quantity to 0. Your website then shows it as sold out, so nobody can buy it twice.
- Add the tag Sold. The piece then appears on your Sold page, which shows customers how fast your pieces go.
- Click Save.
7Create a discount
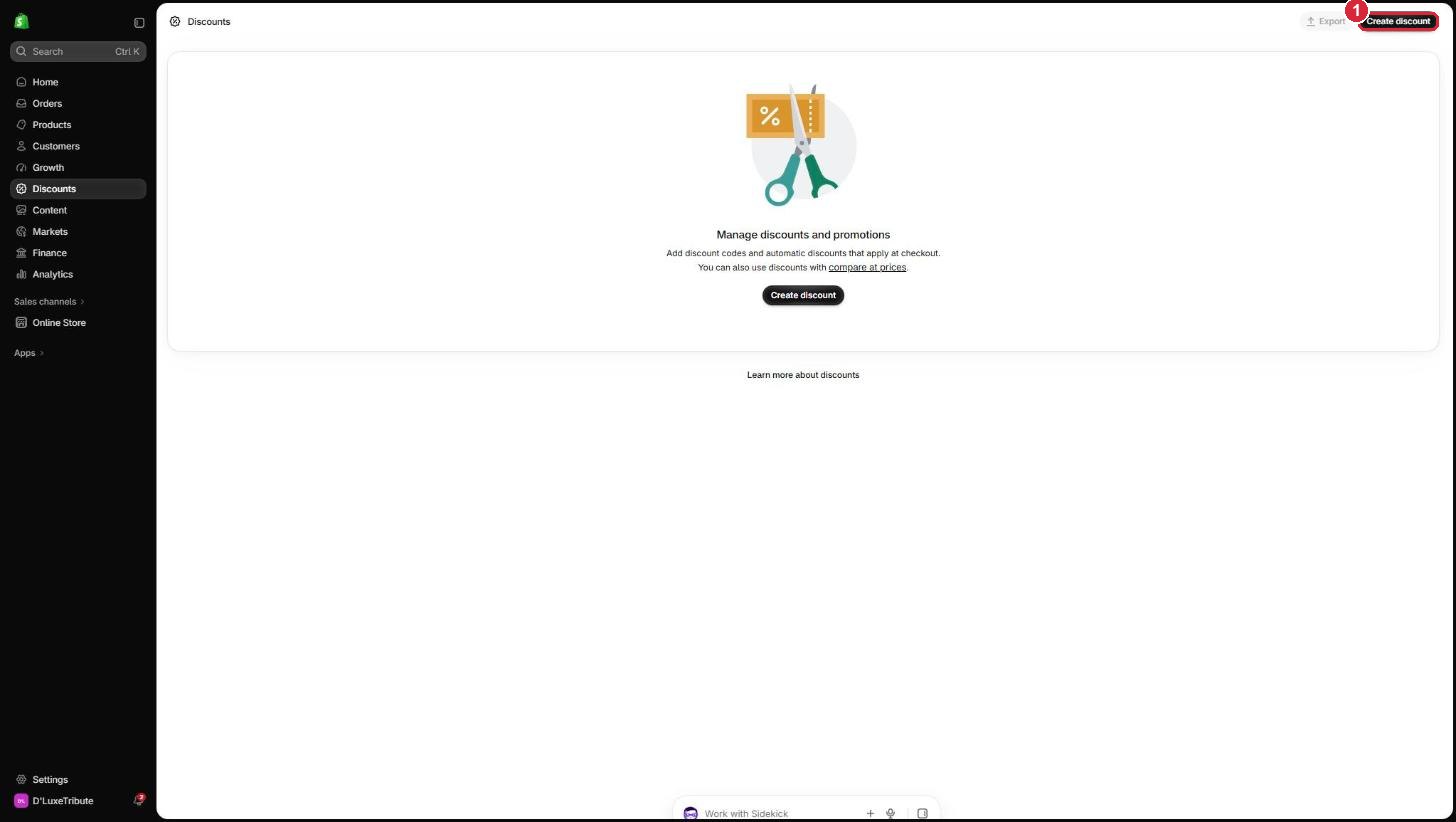
- Click Discounts on the left, then Create discount.
- Choose the kind of discount. You will see four choices:
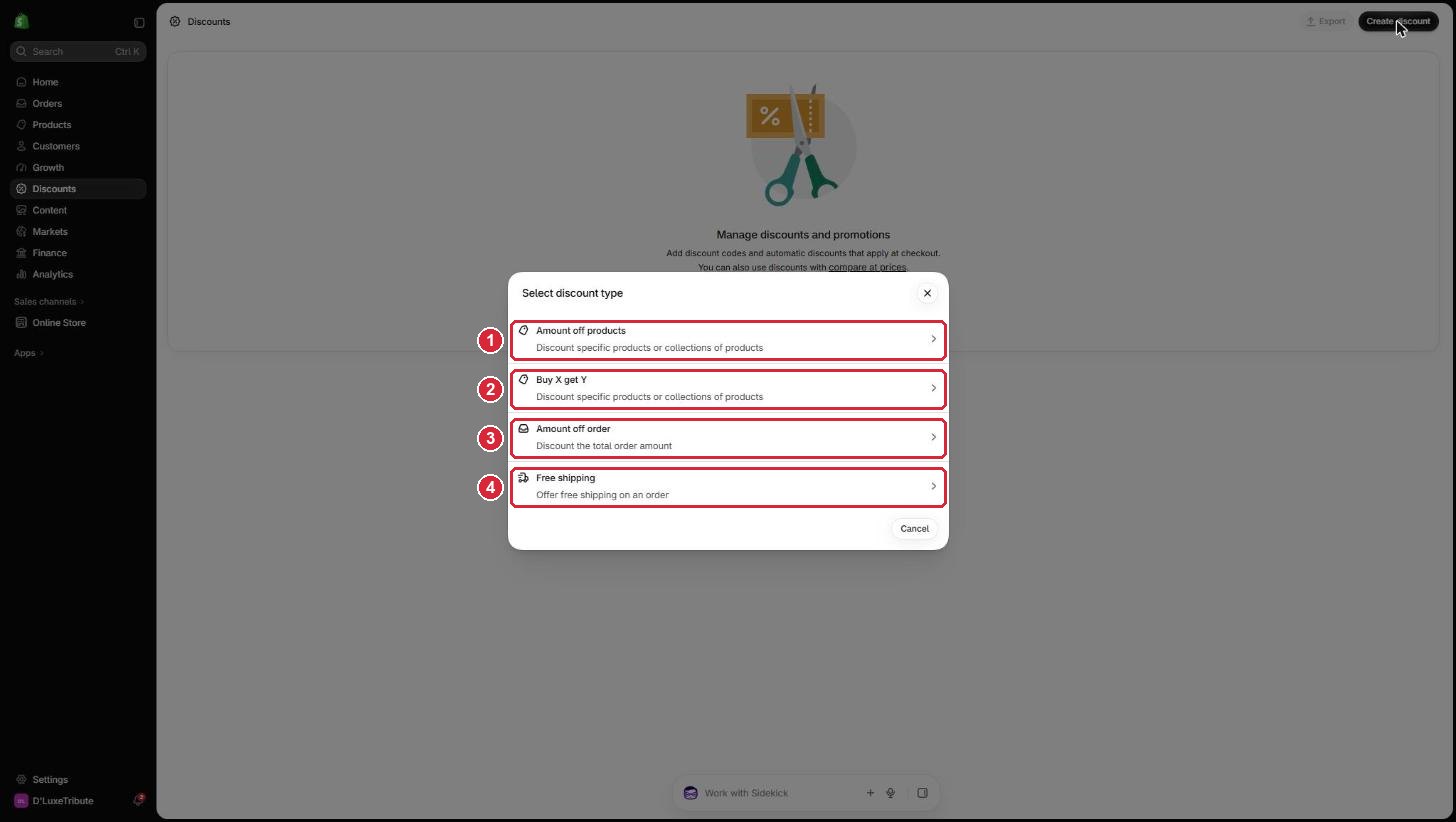
- 1Amount off products: a % or S$ off chosen pieces or collections, for example 10% off all Chanel.
- 2Buy X get Y: buy one piece, get money off another.
- 3Amount off order: money off the whole order, for example S$50 off orders over S$1,000.
- 4Free shipping: free delivery on an order.
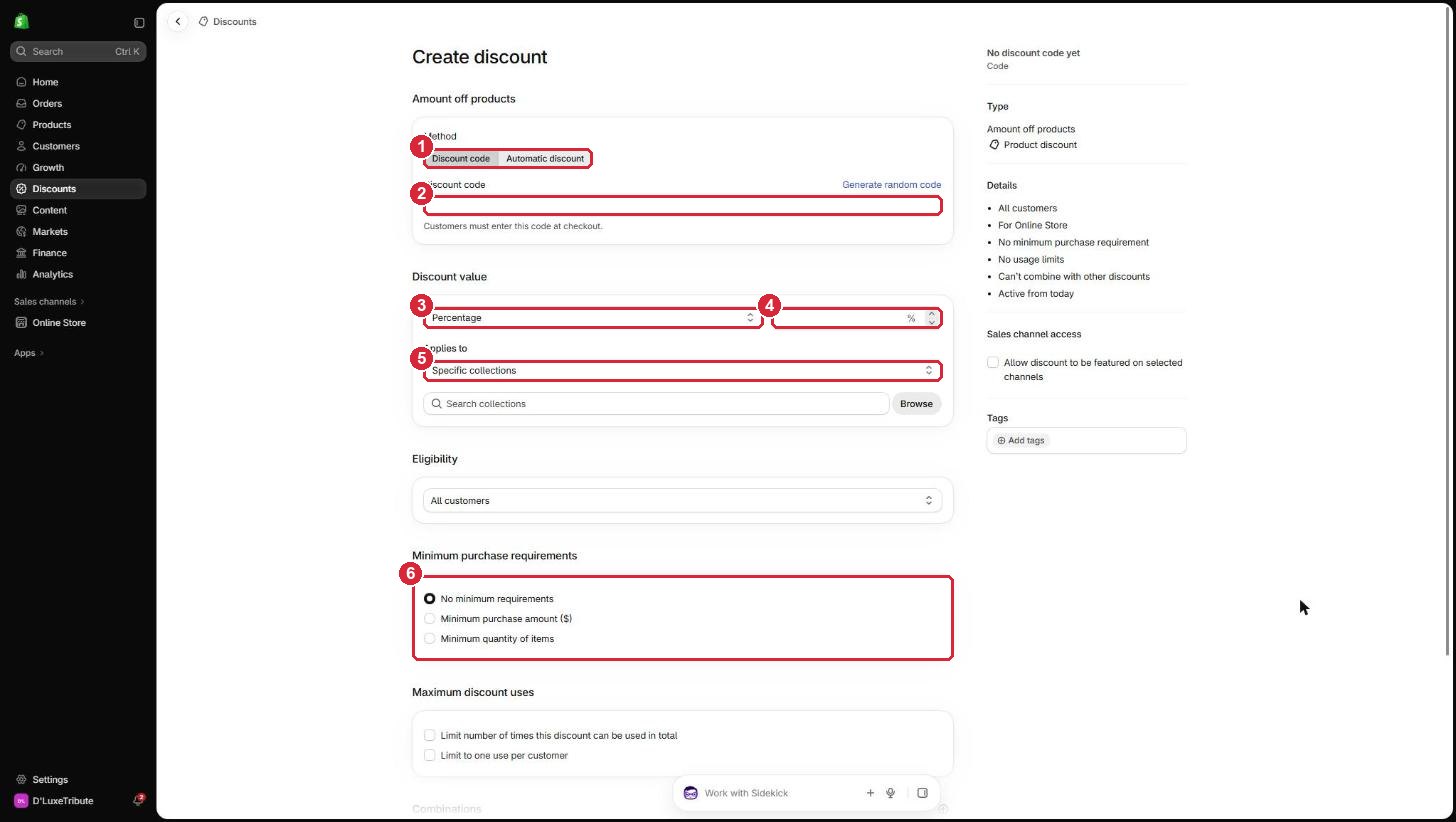
- 1Discount code (customers type a code at checkout) or Automatic discount (applies by itself, no code needed).
- 2The code, for example VIP10. Click Generate random code for a one-off code.
- 3Percentage or Fixed amount.
- 4How much: the % or S$.
- 5Applies to: specific collections or specific products.
- 6Minimum purchase requirements: none, a minimum S$ amount, or a minimum number of pieces.
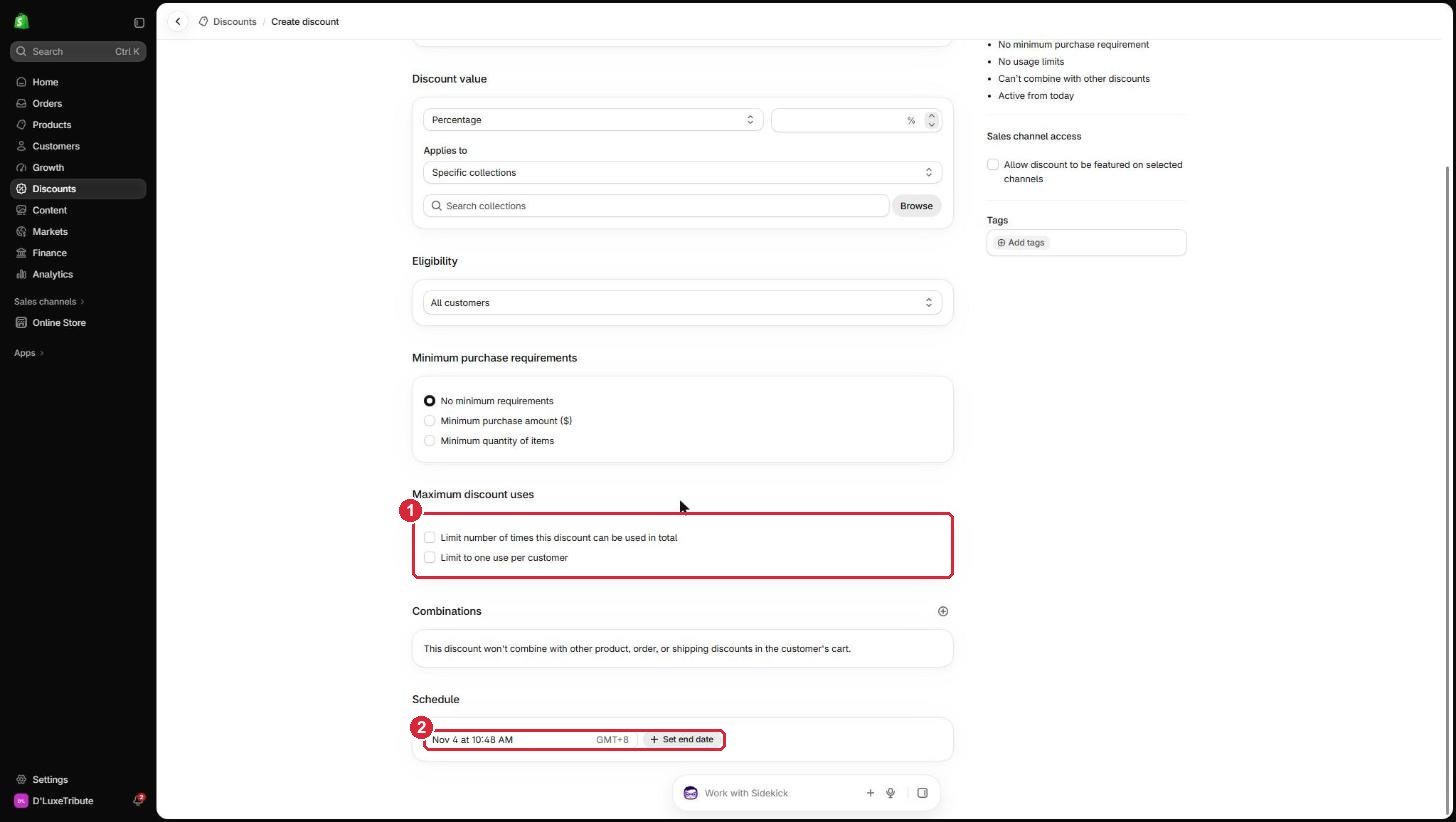
- 1Maximum discount uses: limit the total uses, or one use per customer.
- 2Schedule: when it starts. Click Set end date so a sale ends by itself.
- Click Save. The discount is live from the start date.
8Images and files in Content
Content > Files holds every image and file your store uses: product photos, the logo and banner images.
- Click Content on the left, then Files.
- Click + Files at the top right and choose images or PDFs from your computer. You can also drag files onto the page.
- To use a file, click its row, then copy its link.
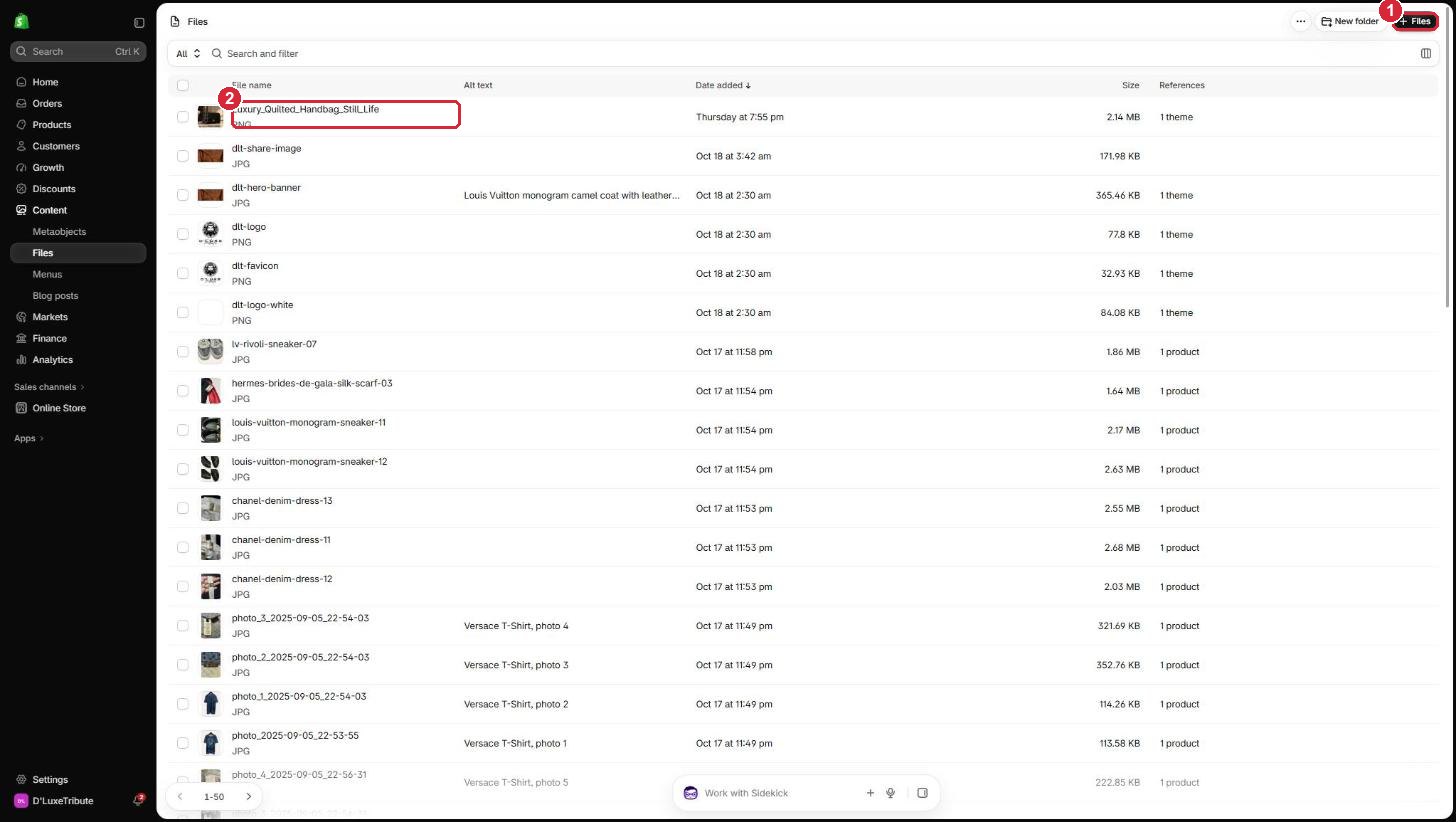
- 1+ Files: upload images, videos or PDFs.
- 2A file. References on the right shows where it is used.
Product photos are best added on the product itself (section 5). To change a picture on your homepage, see the next section.
9Change a homepage picture
- Click Online Store on the left, then Edit theme.
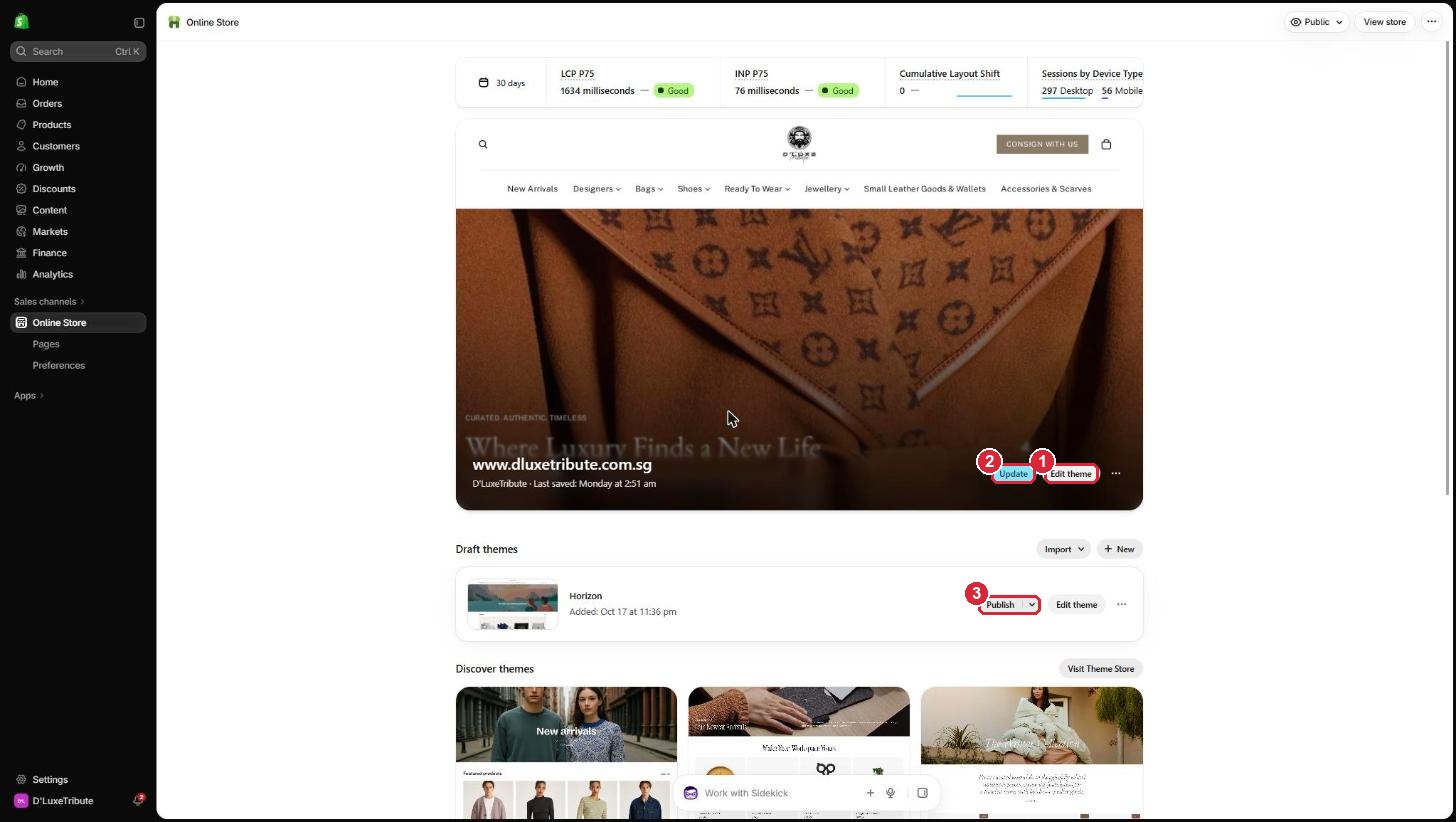
- 1Edit theme: opens the editor for your live website.
- 2Update: please do not press it. A theme update can undo parts of our design. Ask us first.
- 3Publish on the Horizon draft: please do not press it. It would replace your whole website design.
- On the left, click the section you want to change, for example Hero (the large picture at the top).
- On the right, click the picture under Image, then choose a new one from your files or upload one.
- To change the words, click the Text line under the section and type in the box on the right.
- Check the preview in the middle, then click Save at the top right. Nothing changes on your website until you click Save.
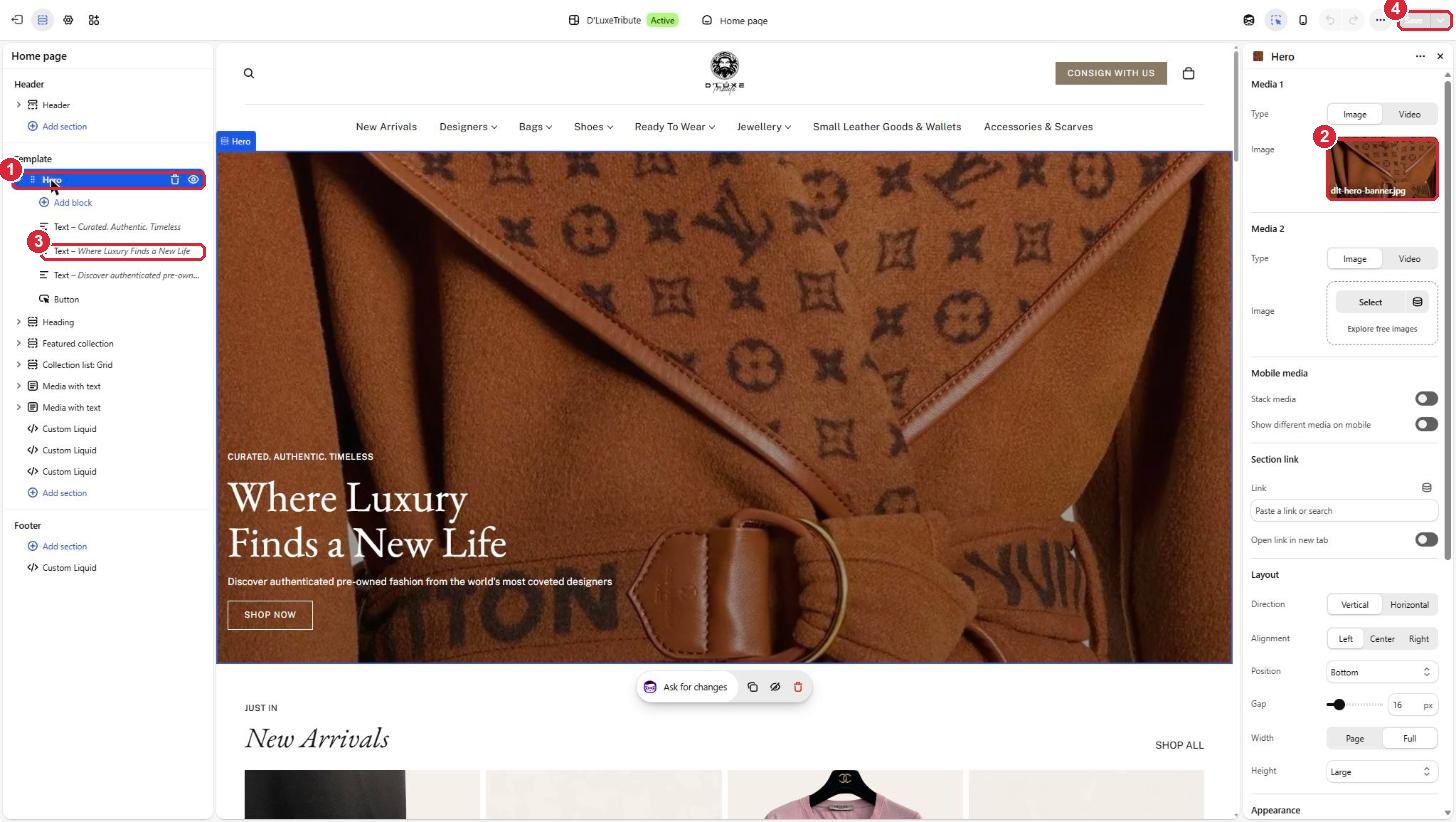
- 1The Hero section.
- 2Its Image: click to replace.
- 3A Text line: click to change the words.
- 4Save.
10Your sales and performance
- Click Analytics on the left. You will see your sales, orders and visitors on one page.
- Change the dates at the top to compare periods, for example this month against last month.
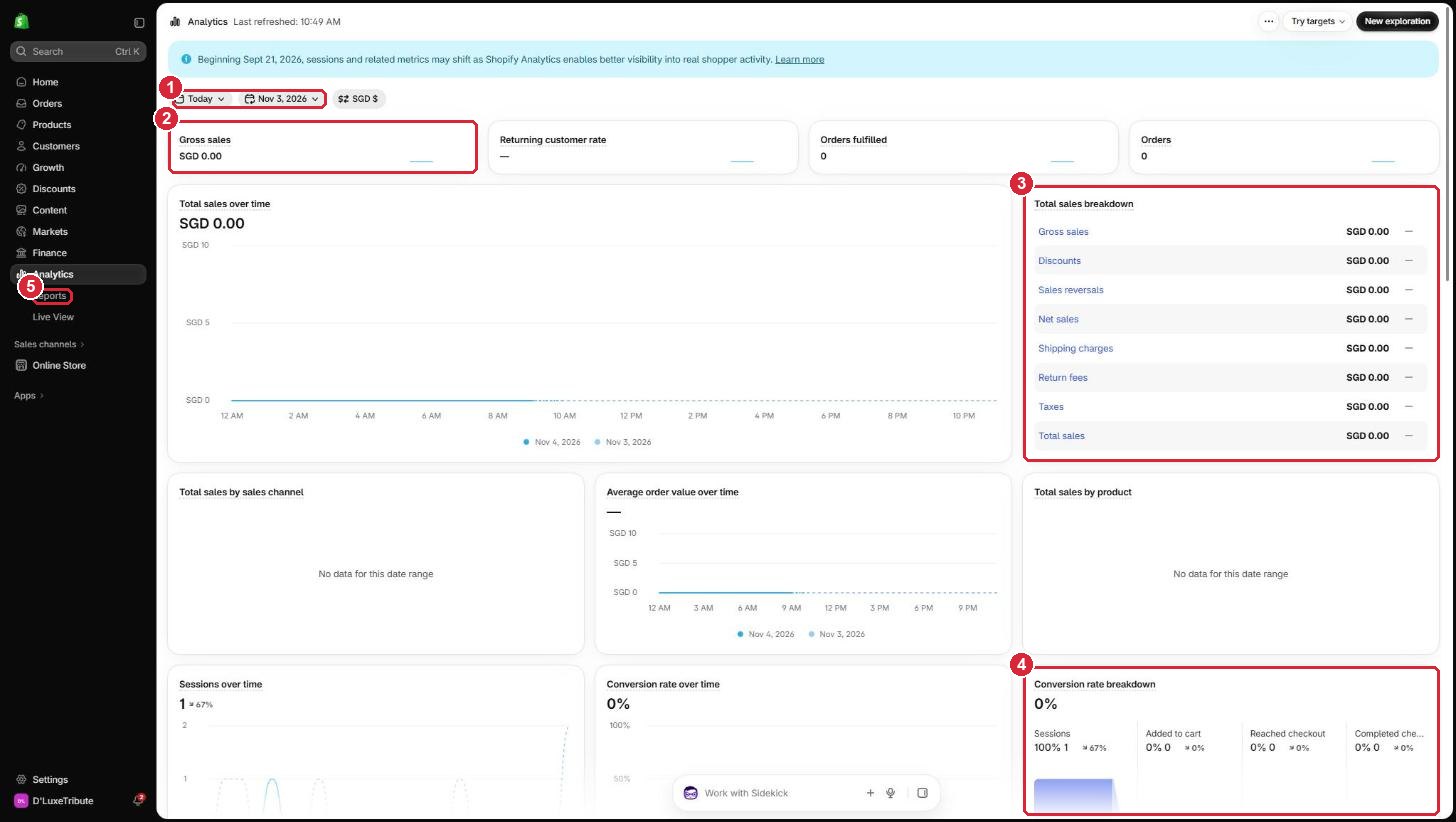
- 1The dates you are looking at.
- 2Gross sales: the value of everything sold, before discounts and returns.
- 3Total sales breakdown: discounts, returns, delivery charges and what you actually took.
- 4Conversion rate breakdown: out of everyone who visited, how many added to cart, reached checkout and bought.
- 5Reports: ready-made reports, for example sales by product or by month. Live View below it shows who is on your website right now.
For who visits your website and how they find you on Google, see section 11 and section 12.
11Google Analytics: who visits and what they look at
Google Analytics counts every visit to your website: how many people came, where from, and which pieces they looked at. Shopify Analytics (section 10) is best for sales; Google Analytics is best for visitors.
- Go to analytics.google.com and log in with the Google account we give access to at handover.
- Check the top left says D'LuxeTribute. You will see the Home page.
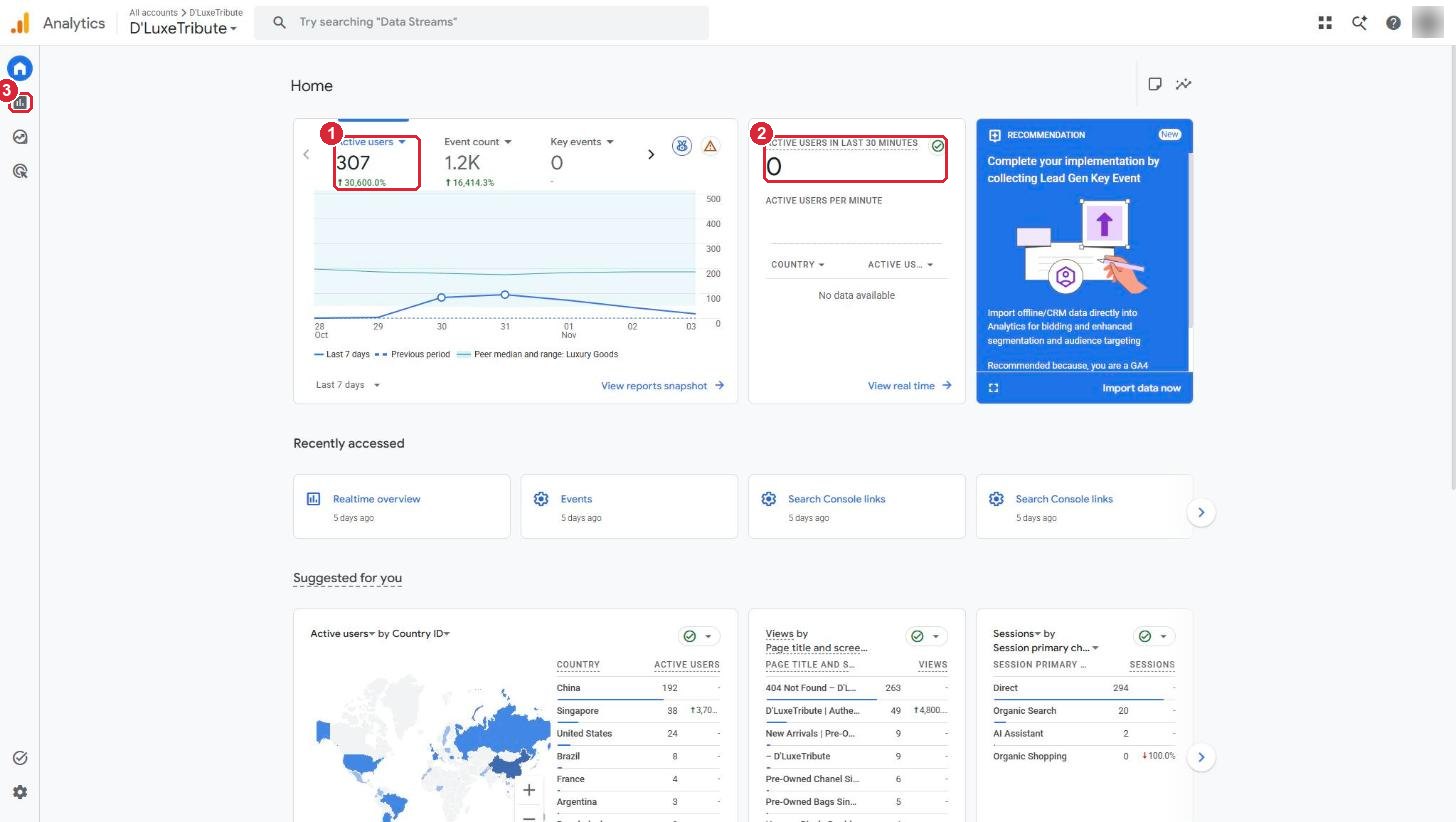
- 1Active users: how many different people visited in the last 7 days.
- 2Active users in last 30 minutes: who is on your website right now.
- 3Reports: opens the detailed reports.
- Click Reports on the far left. The report menu opens.
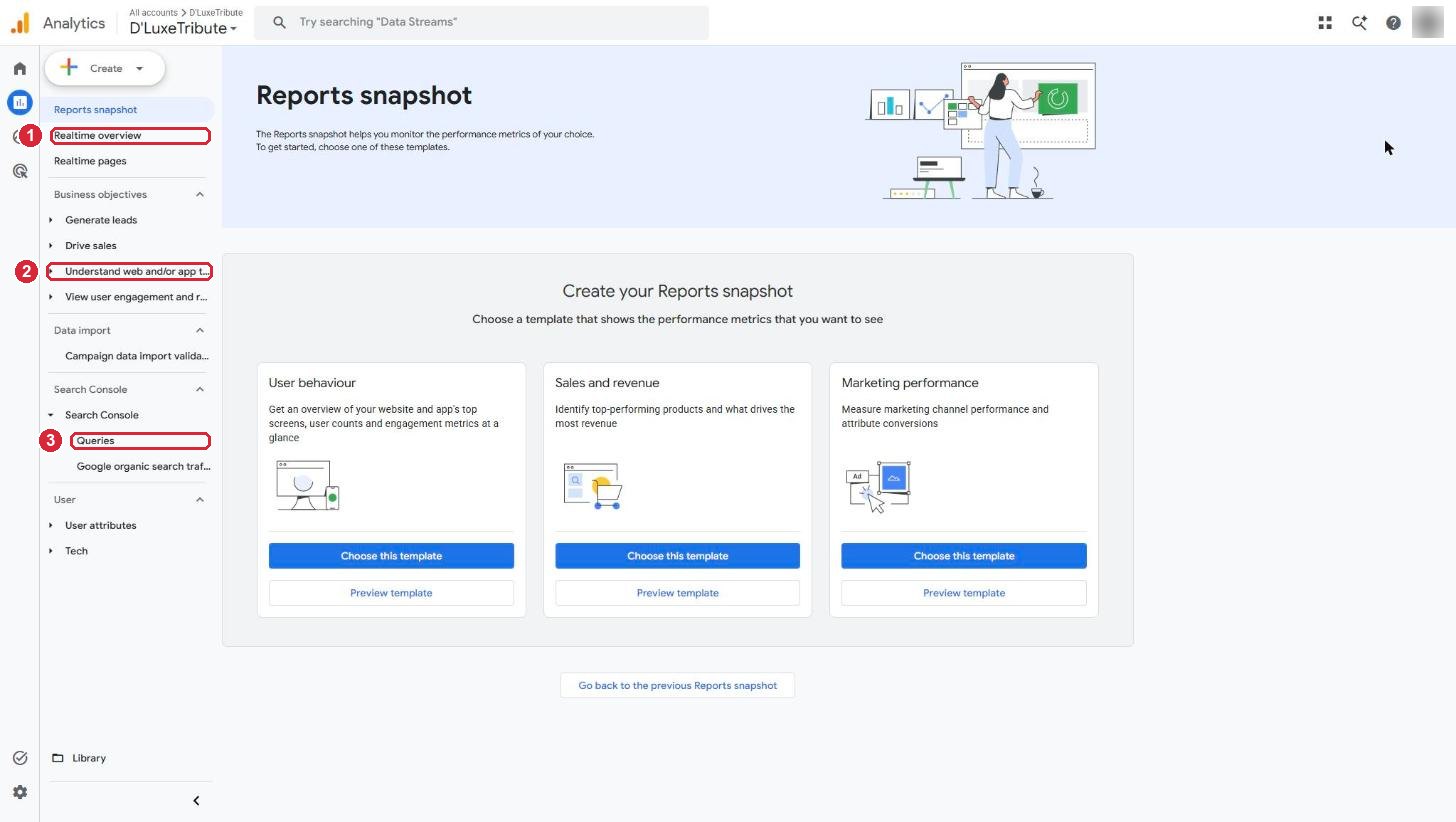
- 1Realtime overview: visitors in the last 30 minutes. Useful during a sale or after a post.
- 2Understand web and/or app traffic: click it to open Overview and Pages and screens.
- 3Search Console > Queries: the Google searches that brought people to you.
- Click Understand web and/or app traffic, then Overview.
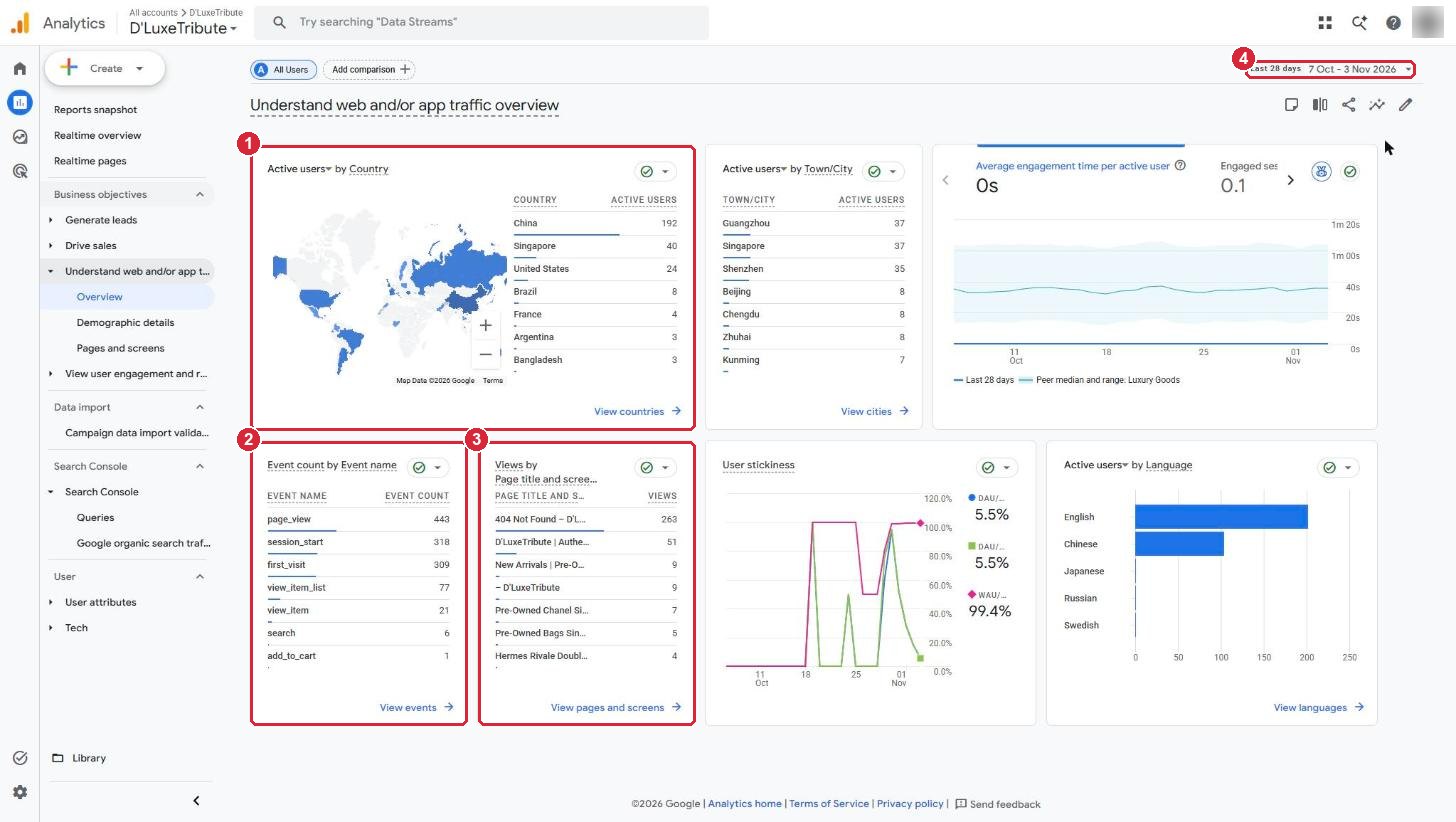
- 1Where your visitors are, by country.
- 2What they did: view_item means they opened a piece, add_to_cart means they added one to the cart.
- 3The pages people viewed most.
- 4The dates. Click to change, for example to Last 28 days.
- Click Pages and screens to see every page ranked by views.
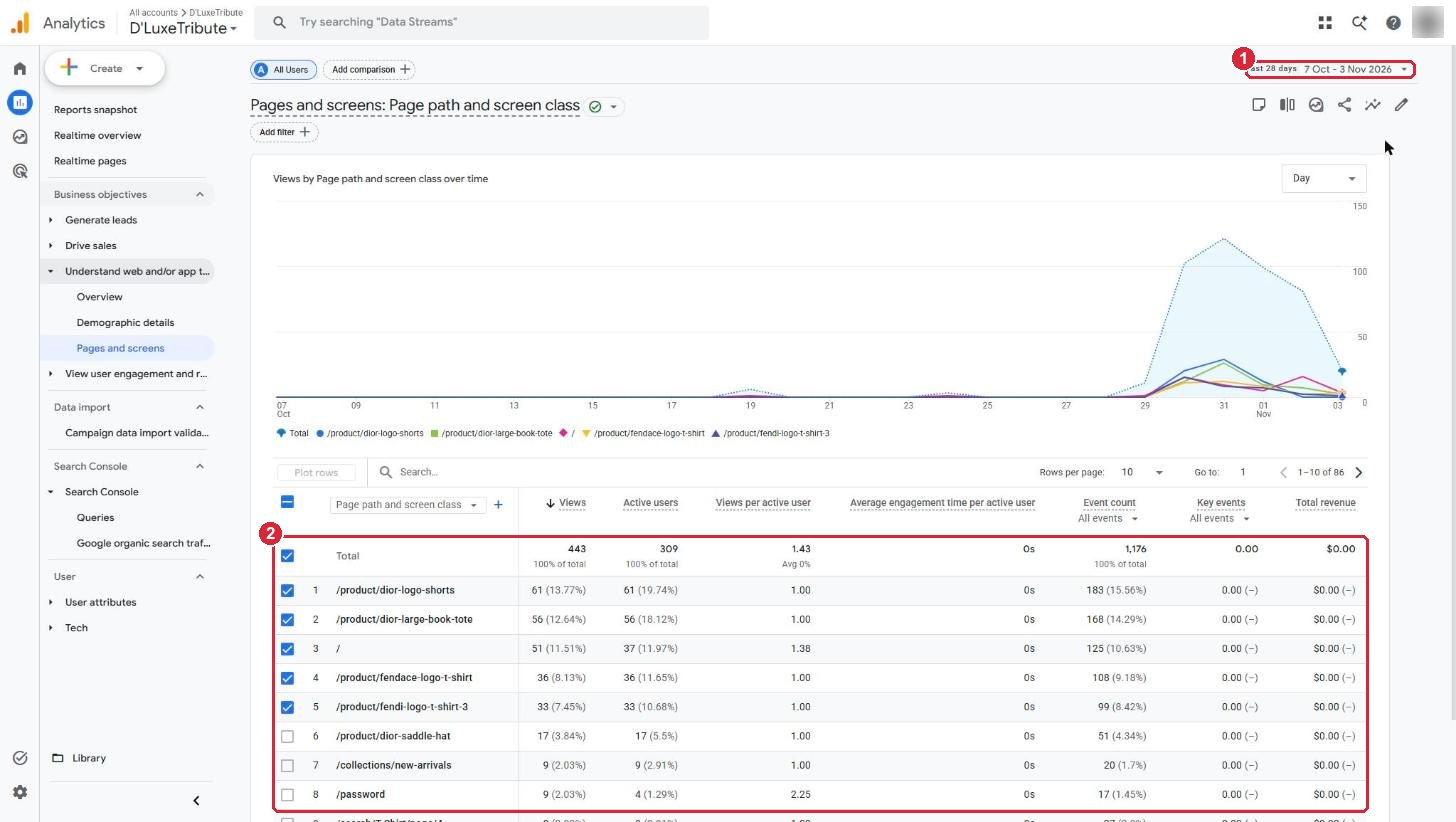
- 1The dates.
- 2Your pages, most viewed first. A product page near the top is a piece people are interested in.
12Google Search Console: how you show up on Google
Search Console shows how often your website appears in Google search results, how many people click, and the words they searched.
- Go to search.google.com/search-console and log in with the same Google account.
- Check the top left says dluxetribute.com.sg, then click Performance on the left.
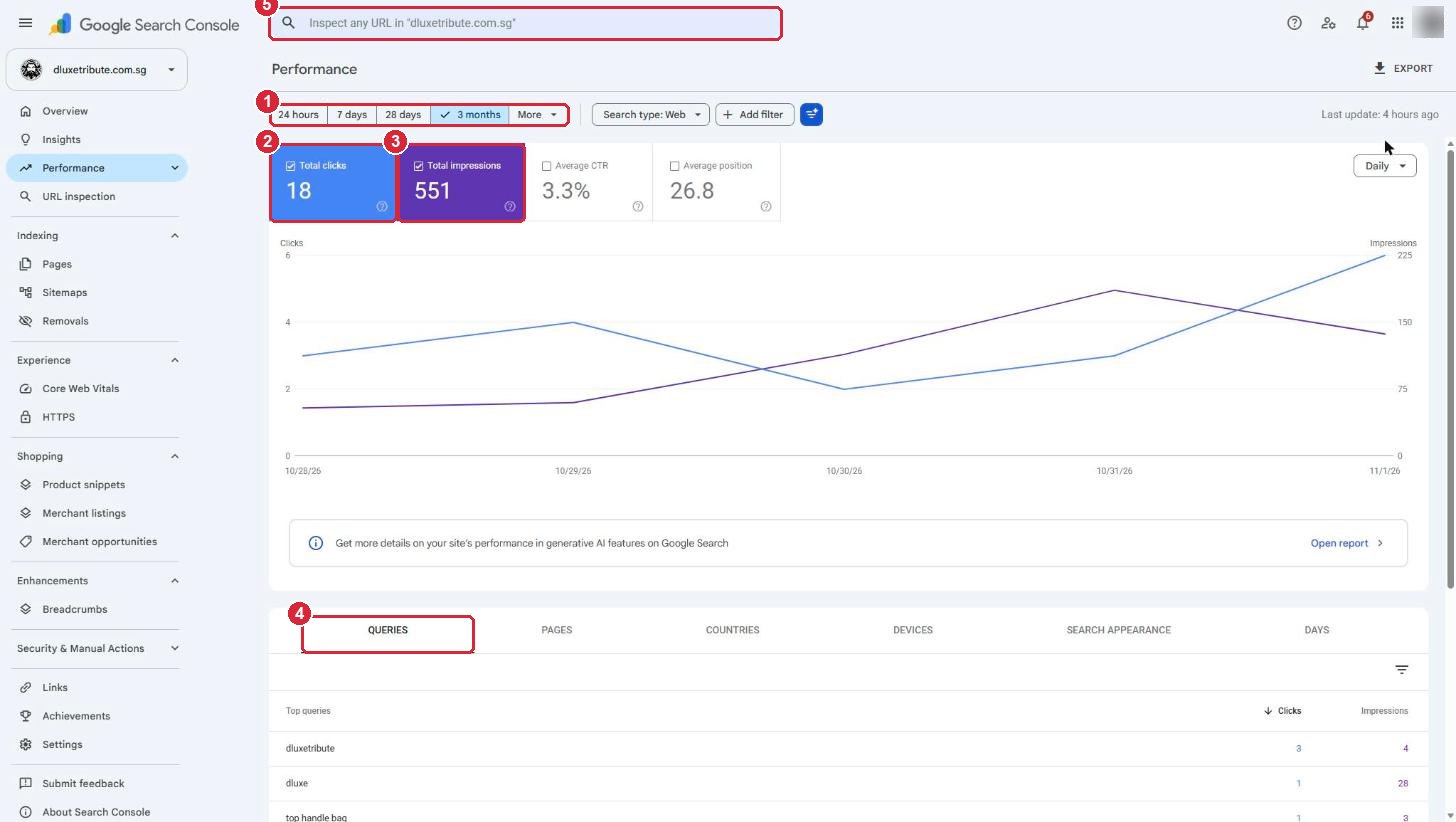
- 1The dates. 3 months gives the clearest picture.
- 2Total clicks: people who came to your website from Google.
- 3Total impressions: how many times your website appeared in Google results, clicked or not.
- 4Queries: the exact words people searched. Scroll down to see the list.
- 5Inspect any URL: paste a page link to check Google has it. Useful a few days after you add a new piece.
Then click Sitemaps on the left. Your sitemap (the list of pages Shopify gives Google) should show Success.
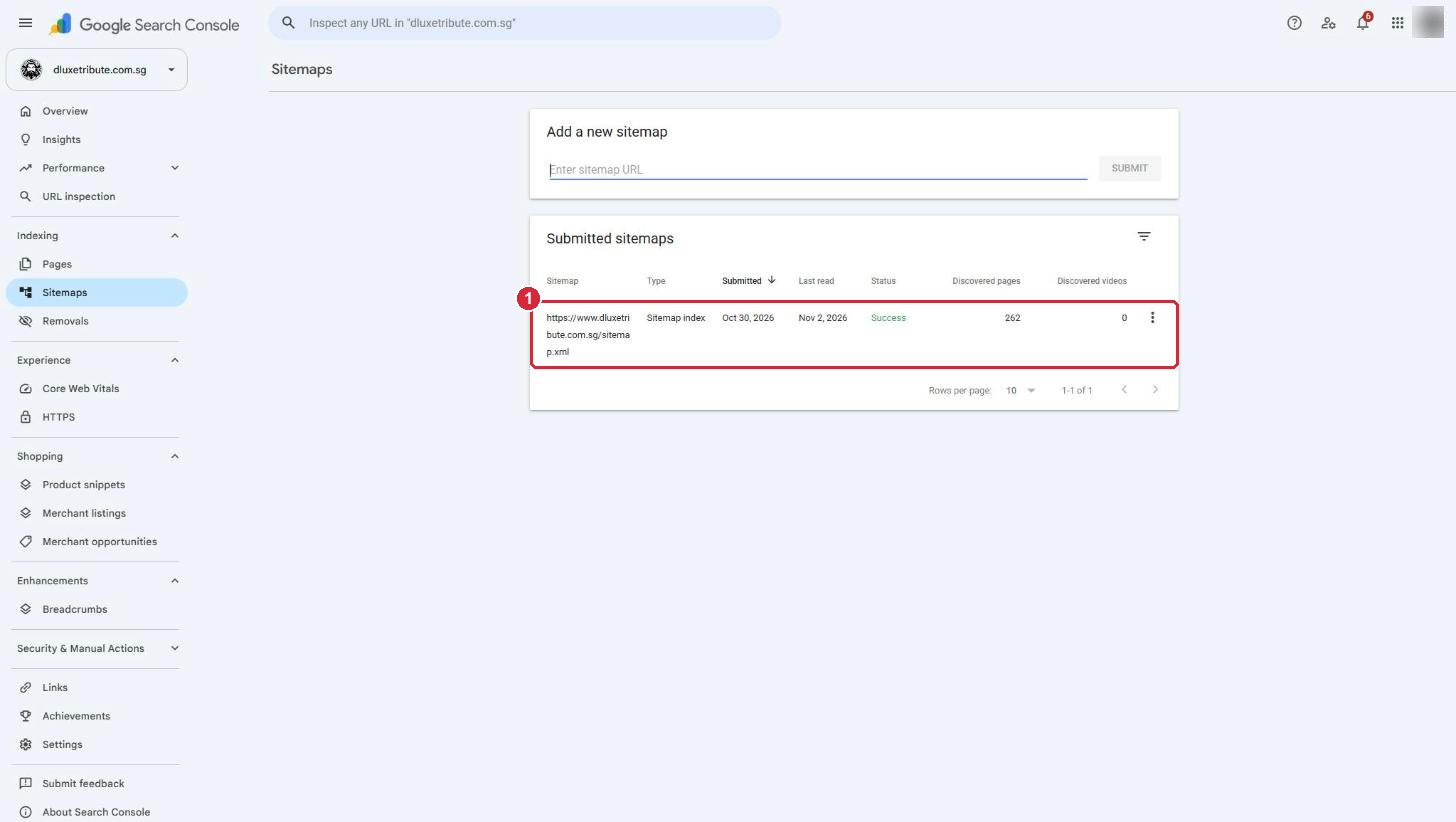
- 1Your sitemap: Success, with the number of pages Google has found. Shopify updates it by itself when you add pieces, so you never need to submit it again.
13Your payouts
When customers pay by card, Apple Pay, Google Pay or Shop Pay, Shopify collects the money and pays it into your bank account. That transfer is a payout.
- Click Finance on the left. You will see your Payout balance.
- Click View payouts to see every payout, its date and which orders it covers.
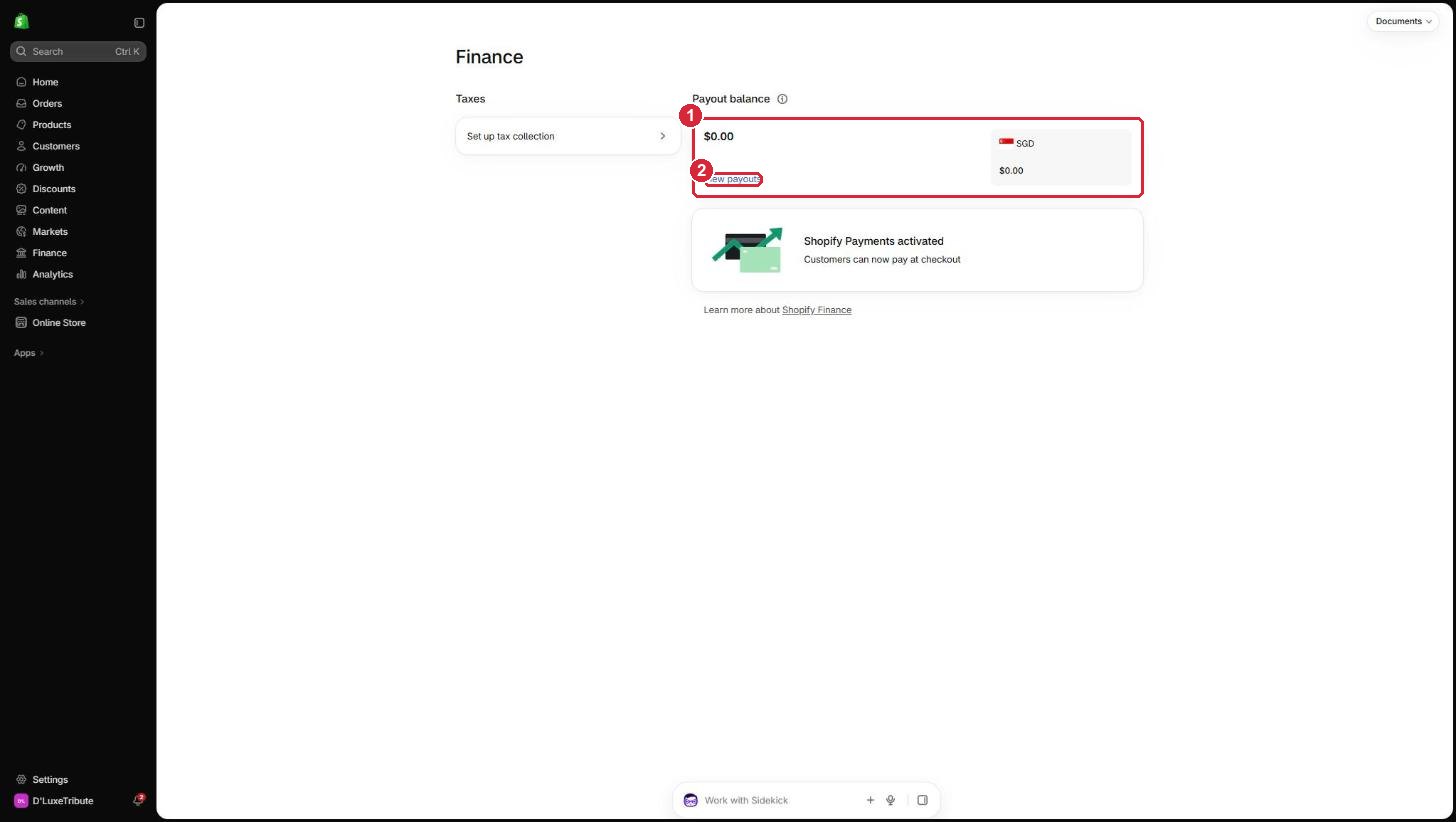
- 1Payout balance: money collected and not yet paid to your bank.
- 2View payouts.
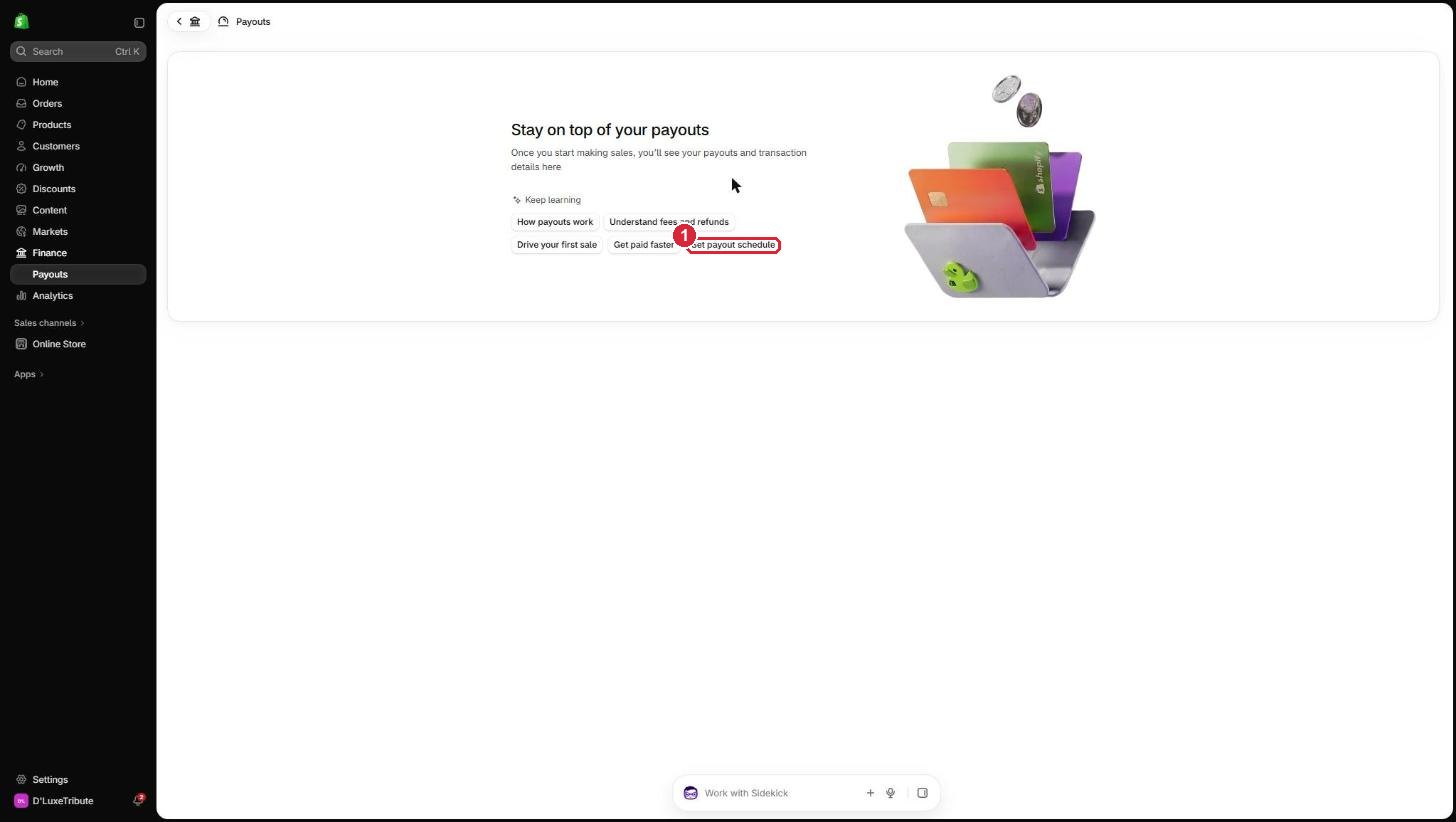
- 1Set payout schedule: choose daily, weekly or monthly payouts.
14Update your policies
Your four policies (Return and refund, Privacy, Terms of service and Shipping) are linked at the bottom of every page and at checkout.
- Click Settings at the bottom left, then Policies.
- Click the policy you want to change.
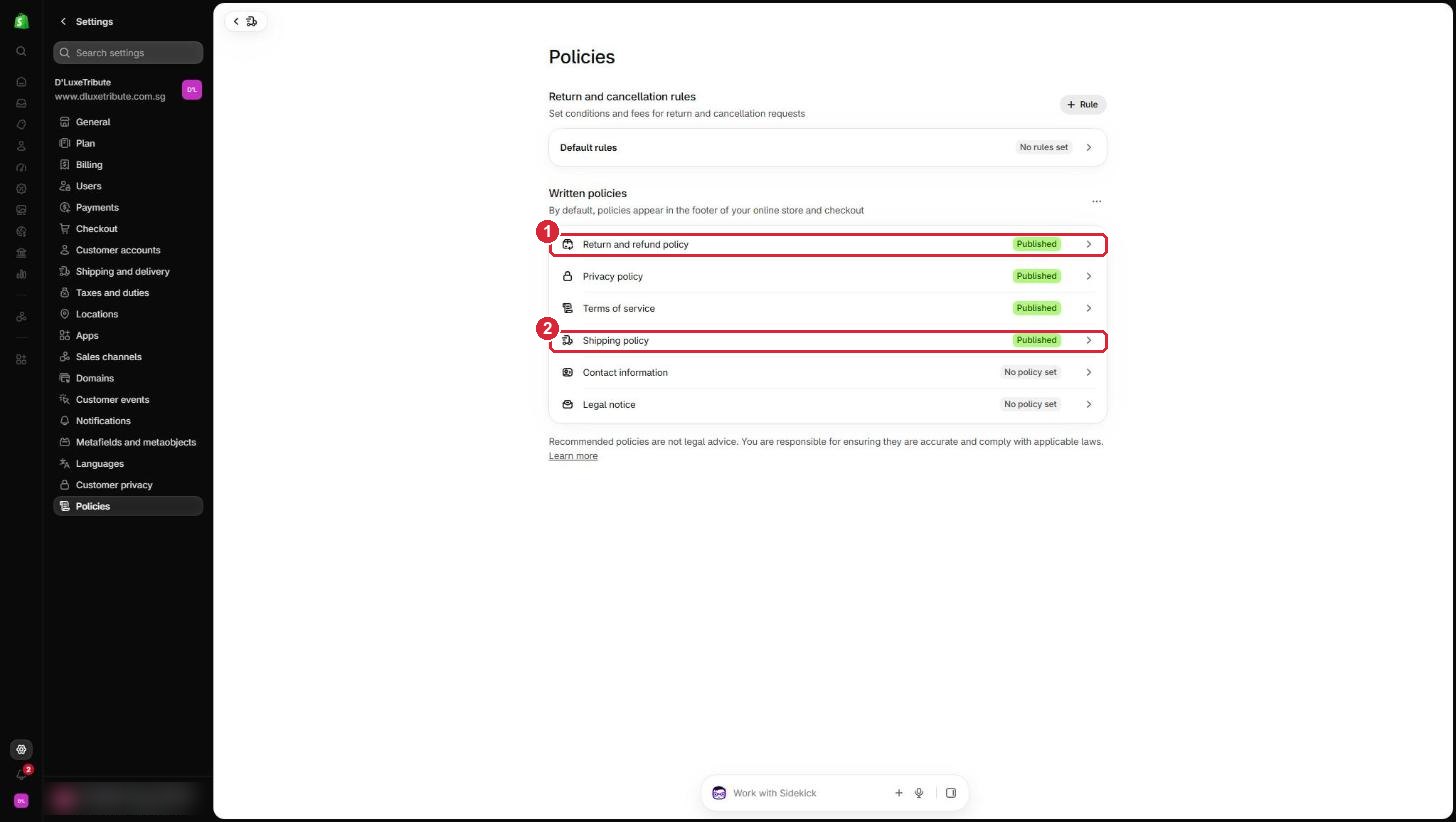
- 1Return and refund policy.
- 2Shipping policy.
- Change the words in the box, then click Save.
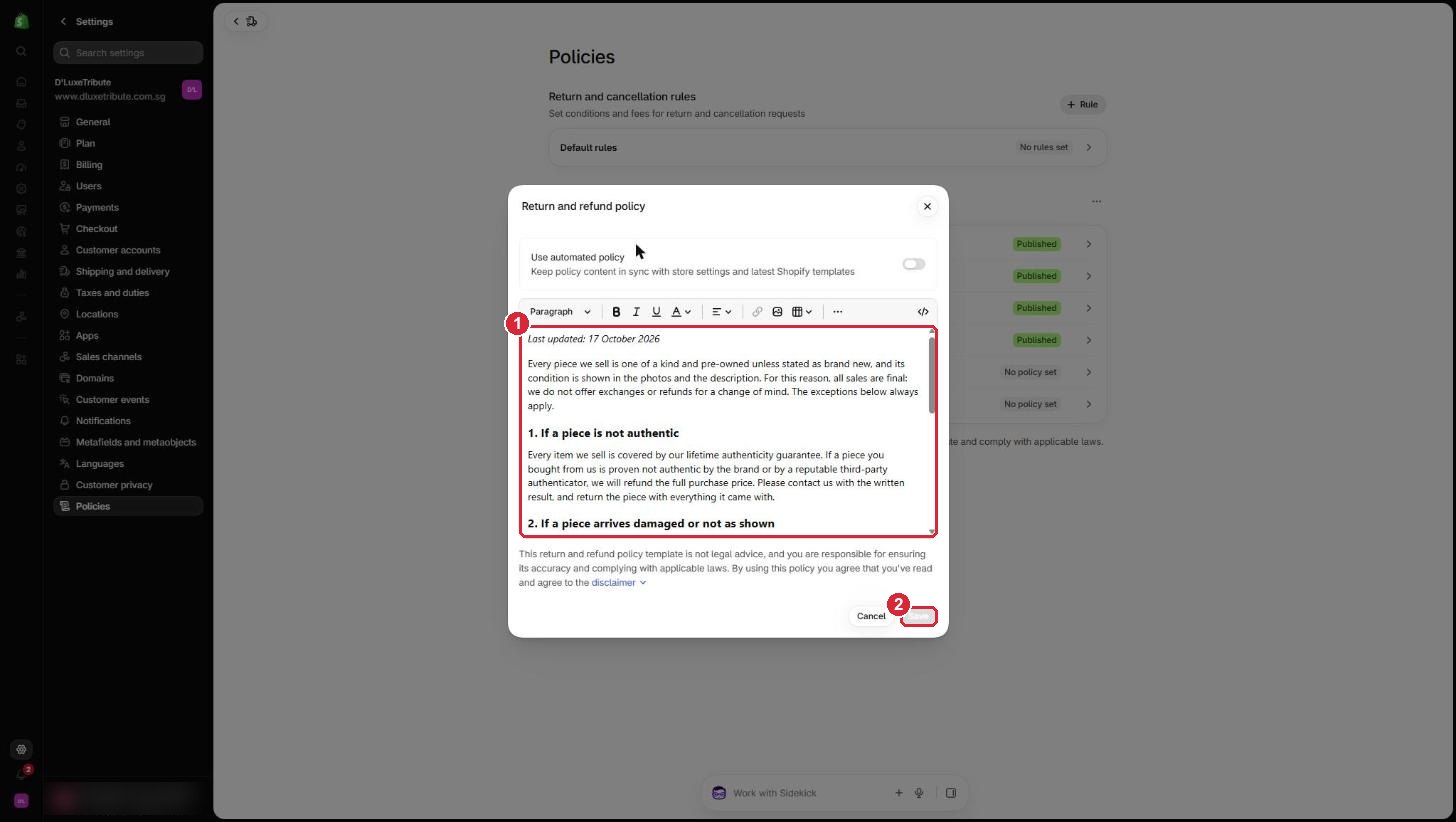
- 1The policy text. Type straight into it.
- 2Save. It goes live straight away.
Also update the "Last updated" date at the top of a policy when you change it.
15Update your company information
- Click Settings, then General.
- Click Store contact details to change your store name, email or phone number.
- Click Store address to change your registered company name and address.
- Click Save.
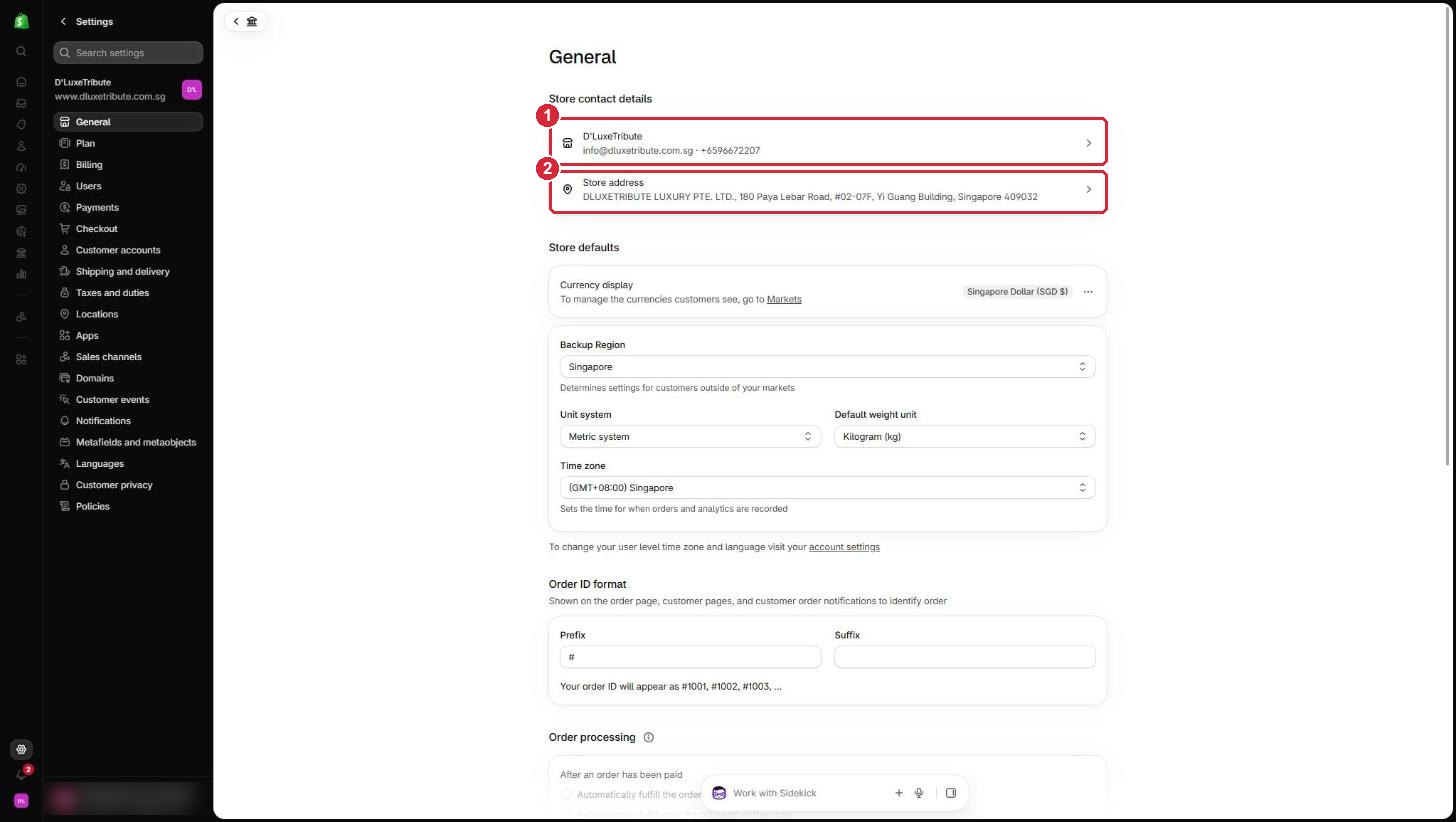
- 1Store contact details: shown to customers, and where order emails go (now info@dluxetribute.com.sg, +65 9667 2207).
- 2Store address: DLUXETRIBUTE LUXURY PTE. LTD., 180 Paya Lebar Road, #02-07F, Yi Guang Building, Singapore 409032. It prints on invoices.
16Delivery and shipping
Your store has three ways to get a piece to a customer: hand delivery by your driver, NinjaVan courier, and pickup at your showroom.
- Click Settings, then Shipping and delivery.
- Click Singapore to see and change your delivery options.
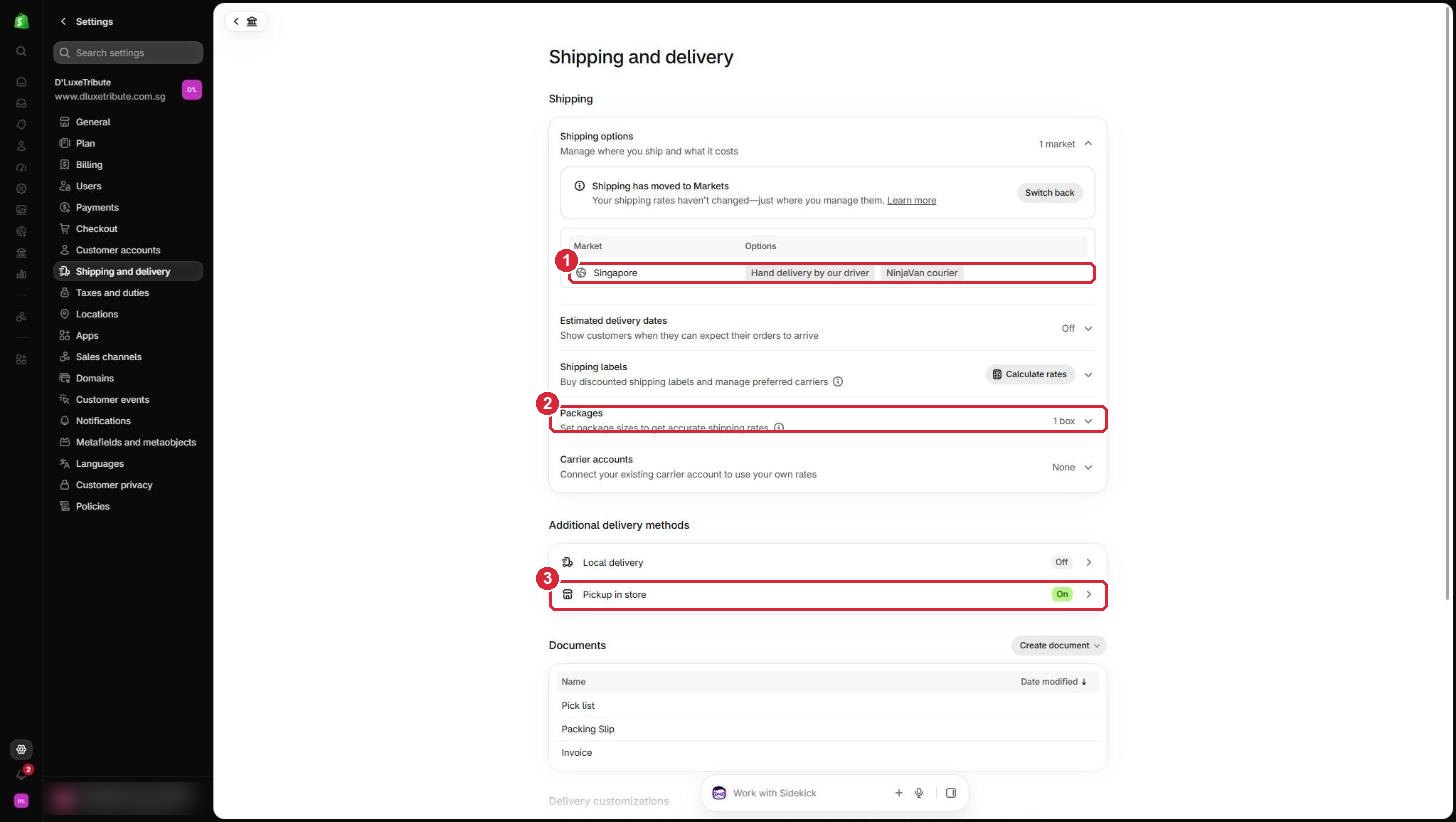
- 1Singapore: your delivery options and charges.
- 2Packages: your default box size.
- 3Pickup in store: collection at your showroom (switched on).
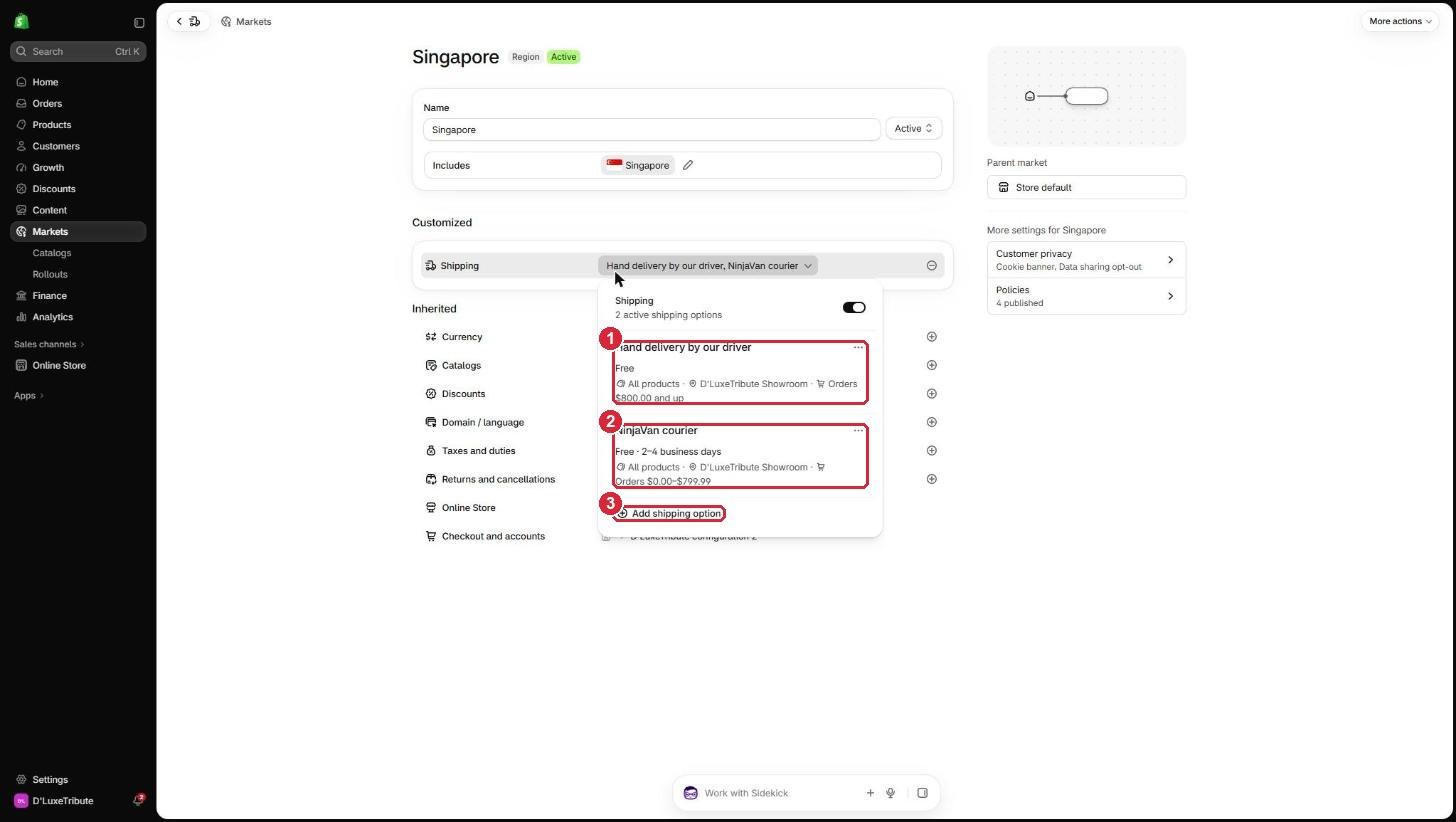
- 1Hand delivery by our driver: free, for orders of S$800 and up.
- 2NinjaVan courier: free, 2 to 4 business days, for orders from S$0 to S$799.99.
- 3Add shipping option: add another delivery choice.
- To change a charge, click the ... next to an option and choose to edit it. Change the price or the order amounts, then click Save.
17Tax (GST)
Your store does not charge GST, because D'LuxeTribute is not GST-registered. Every region shows Not collecting.
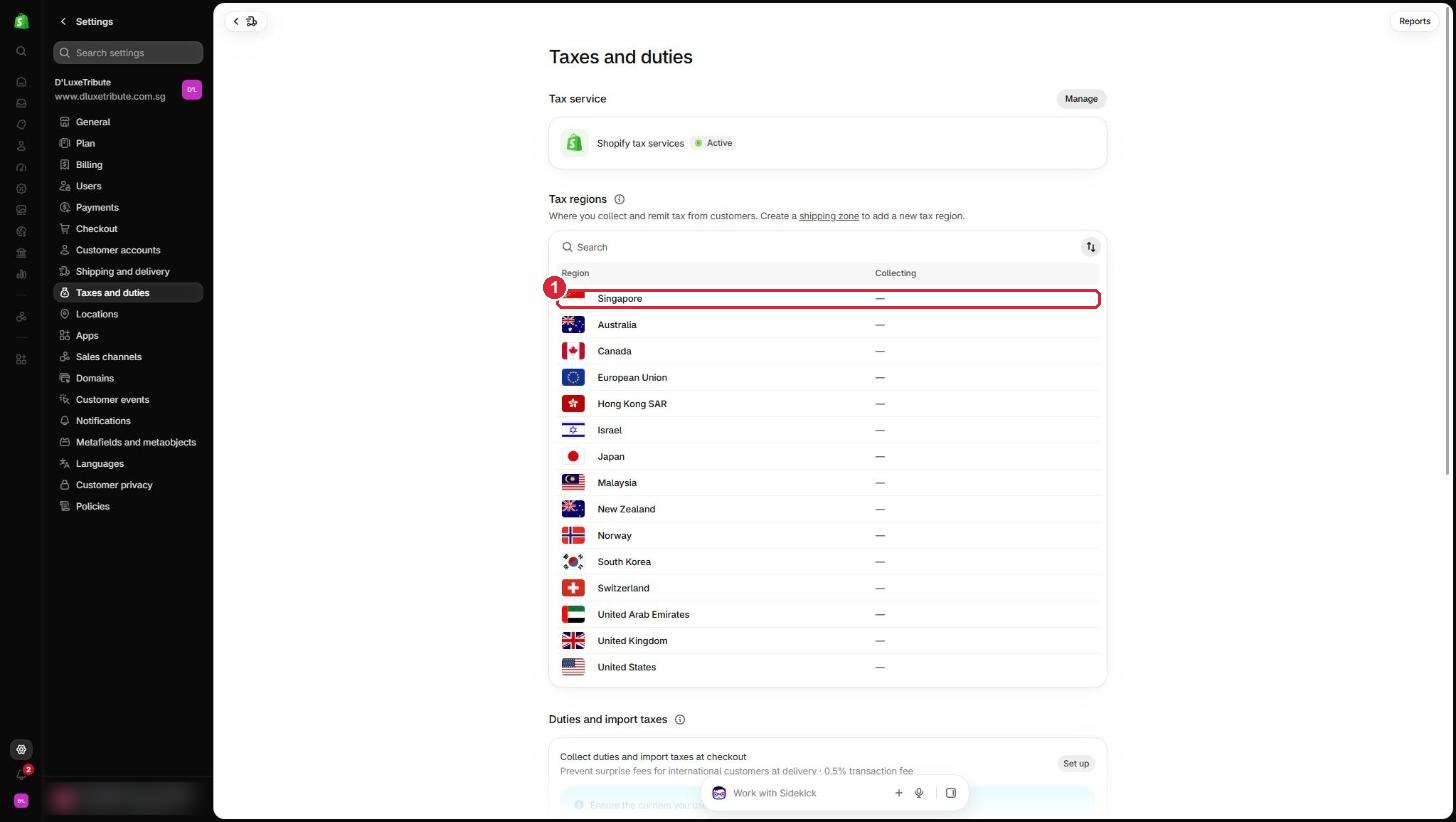
- 1Singapore: not collecting GST.
When you become GST-registered
- Click Settings, then Taxes and duties.
- Click Singapore and follow the steps to start collecting GST. You will be asked for your GST registration number. Click Save.
- On the same Taxes and duties page, decide whether your prices include GST. In Singapore, prices shown to customers usually include it, so switch on Include sales tax in product price and shipping rate.
- Place one test order and check the receipt shows the GST before you announce it.
Ask your accountant for the date you must start charging, and tell us so we can check the website and invoices with you.
18Adding Atome or another payment method
Your store already takes cards (Visa, Mastercard, American Express, UnionPay), Apple Pay, Google Pay and Shop Pay through Shopify Payments. Payouts go to your bank account.
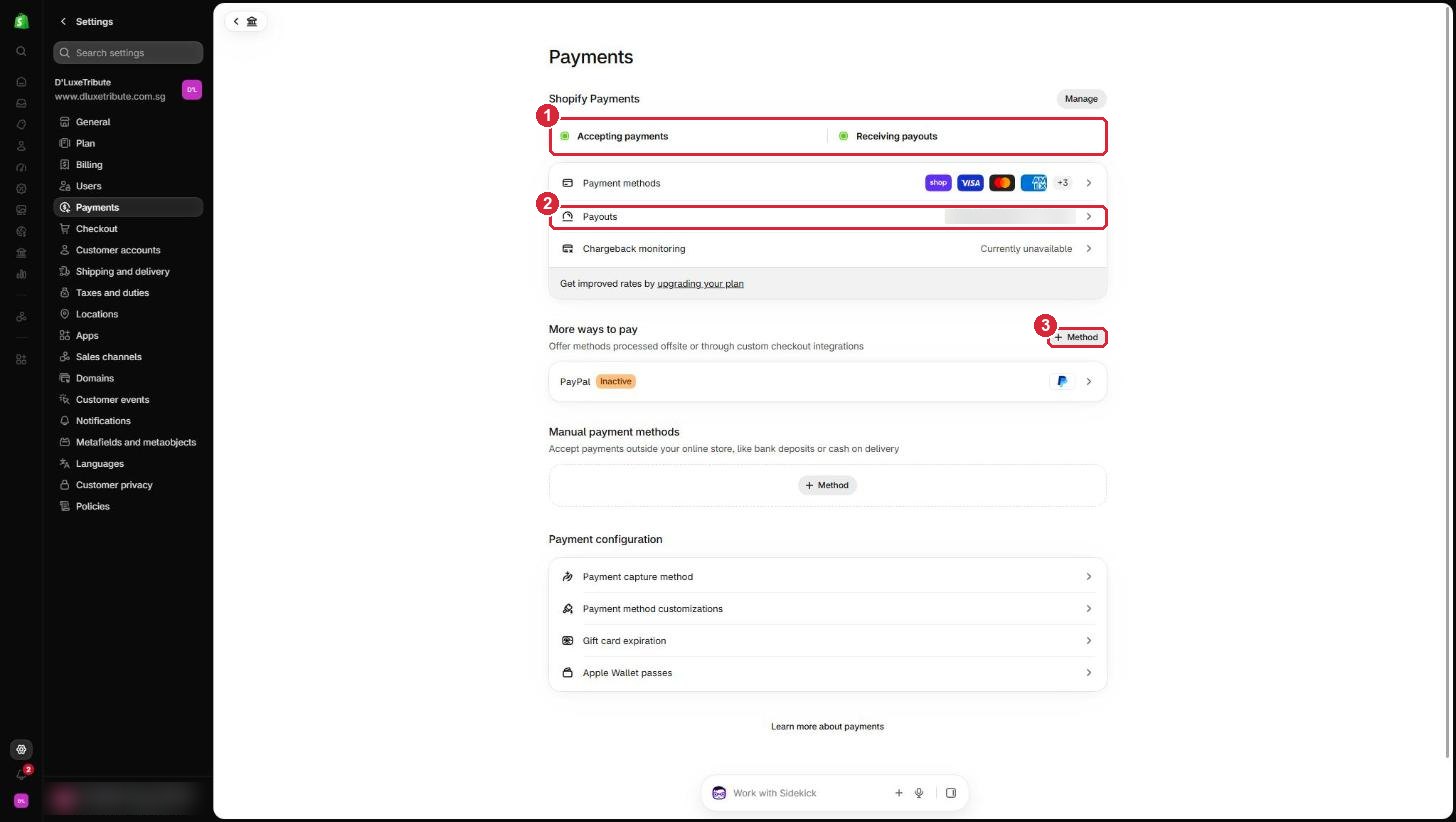
- 1Accepting payments and Receiving payouts: both green means you are set up.
- 2Payouts: the bank account your money goes to. Click to change it.
- 3+ Method: add another way to pay, such as Atome.
How Atome works on Shopify
Atome (buy now, pay later) is not added on its own. It comes through a payment provider: you open an account with the provider, and the provider then shows Atome at your checkout.
- Click Settings, then Payments, then + Method.
- Type Atome in the search box and click it. You will see the providers that offer it.
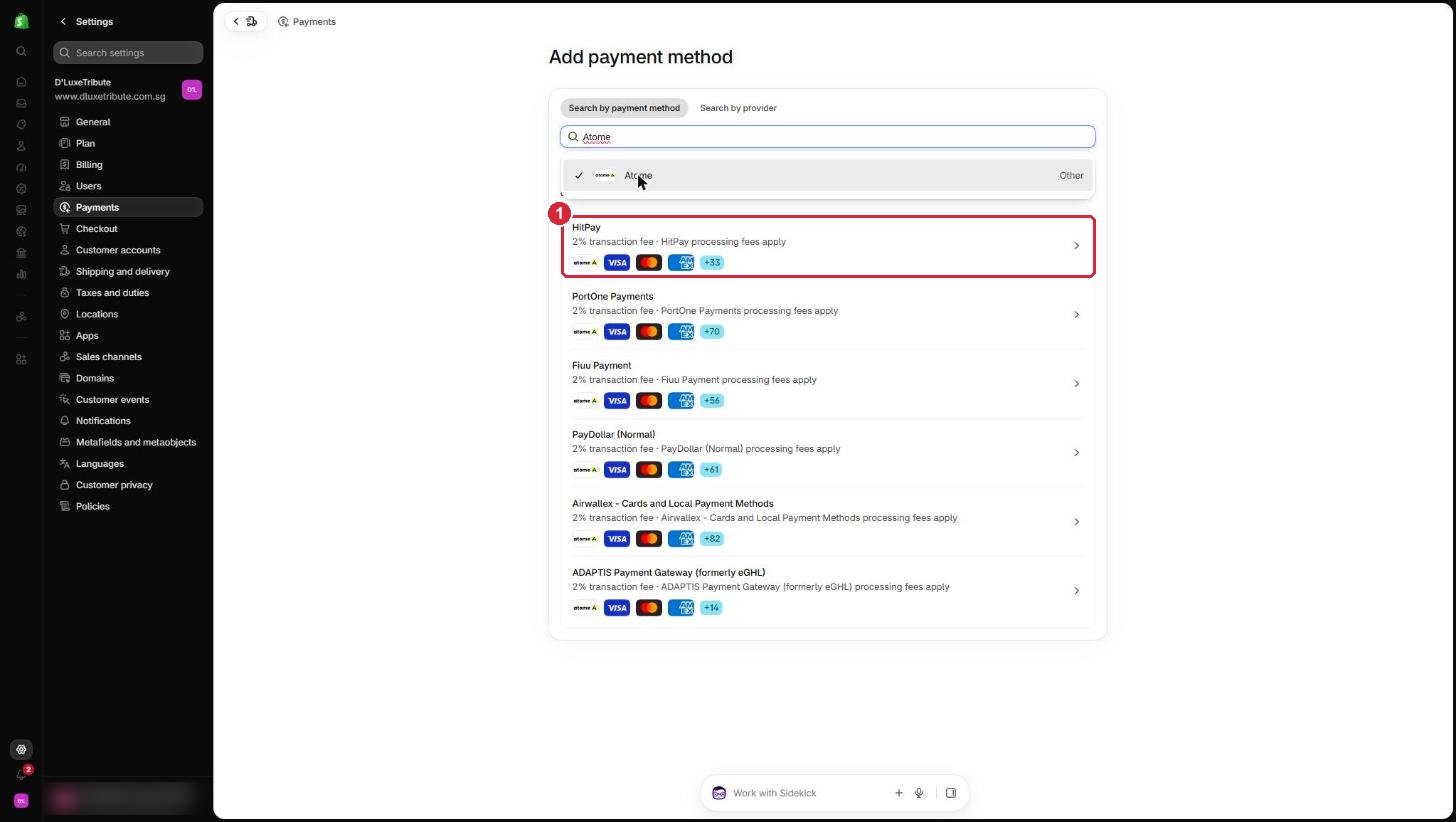
- 1A provider. Each shows "2% transaction fee", which Shopify charges on top of the provider's own fees and Atome's merchant fee.
19Your customers
Customers lists everyone who has bought from you or signed up, with their orders and total spend.
- Click Customers on the left.
- Click a name to see their orders, address and notes. Add your own note, for example their favourite designers, so your team knows them next time.
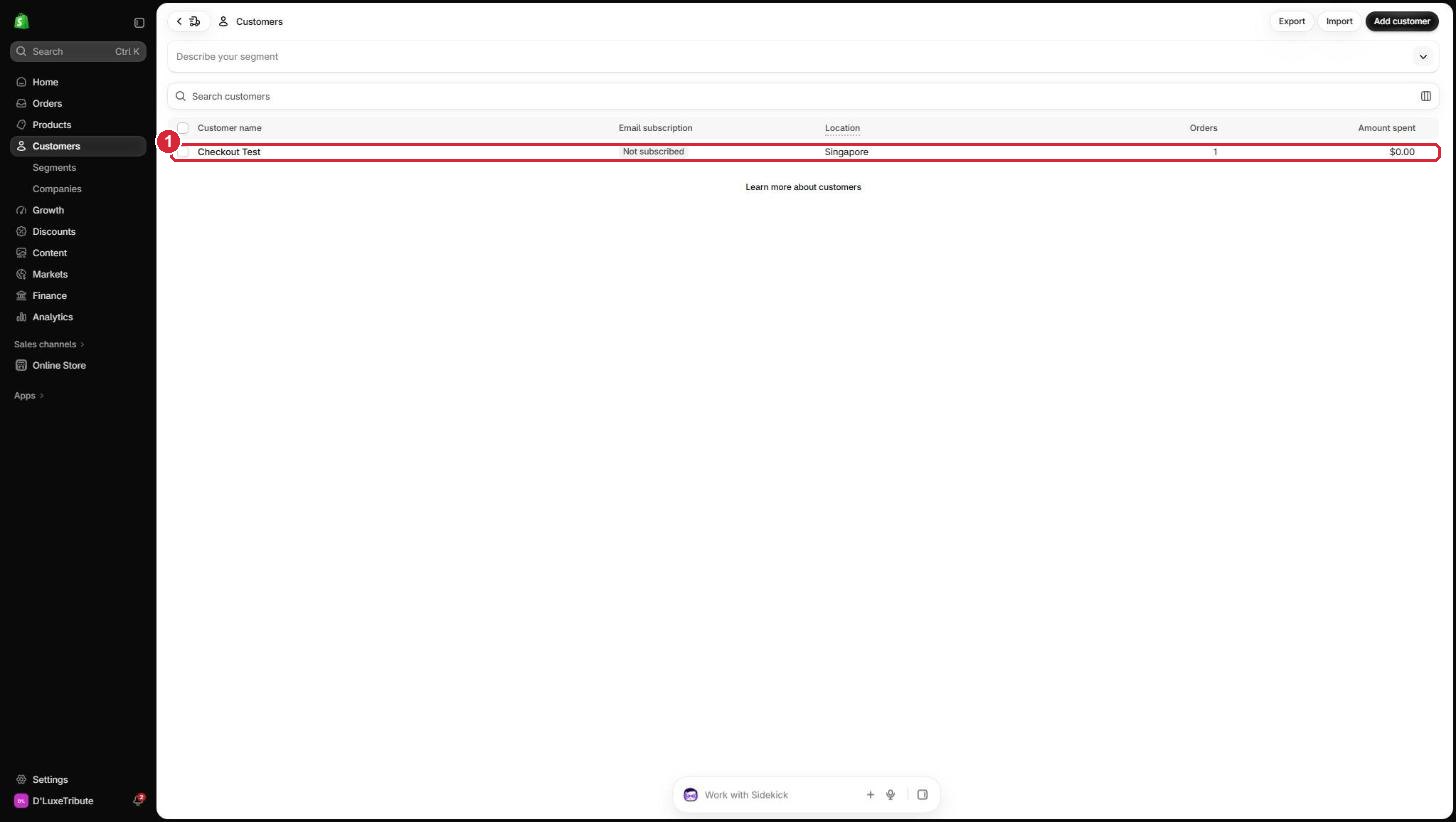
- 1A customer, with their number of orders and amount spent.
20What we look after for you
Send us a support request for any of these:
- Design, layout or how a page looks on phones
- New pages, menu items or homepage sections
- Theme updates
- Any app, before you install it
- Your domain name
- Google Analytics and Search Console settings (reading the reports is yours)
- Anything in this guide that looks different on your screen
Tell us the page and what you want changed. A screenshot helps.
Send a website support request21Good habits
- Never install an app without Genaxis's consent or approval.
- After a change, open your website and check it looks right on your phone.
- Copy titles, sizes ("EU 37") and tags from an existing piece.
- Keep quantity at 1 for each piece, and add the tag Sold when it sells elsewhere.
- Use Draft to hide a piece. Delete only when you are sure.
- Do not press Update or Publish on the Online Store page.
- Keep your Shopify login to yourself. Add staff under Settings > Users so each person has their own login.